
Aromatic Brine Recipe For Tender Flavorful Salmon
Salmon brine recipes unlock the secret to perfectly seasoned, succulent fish that melts in your mouth.
Professional chefs and home cooks alike understand the magic of brining for incredible seafood results.
Moisture preservation becomes an art form when you master this technique for salmon preparation.
Salt solutions work wonders by infusing deep flavor and ensuring tender, juicy fillets every single time.
Seafood enthusiasts recognize brining as a game-changing method that transforms ordinary fish into extraordinary dining experiences.
Precise seasoning techniques guarantee restaurant-quality results that will impress family and friends at your next meal.
Why Brining Salmon Works
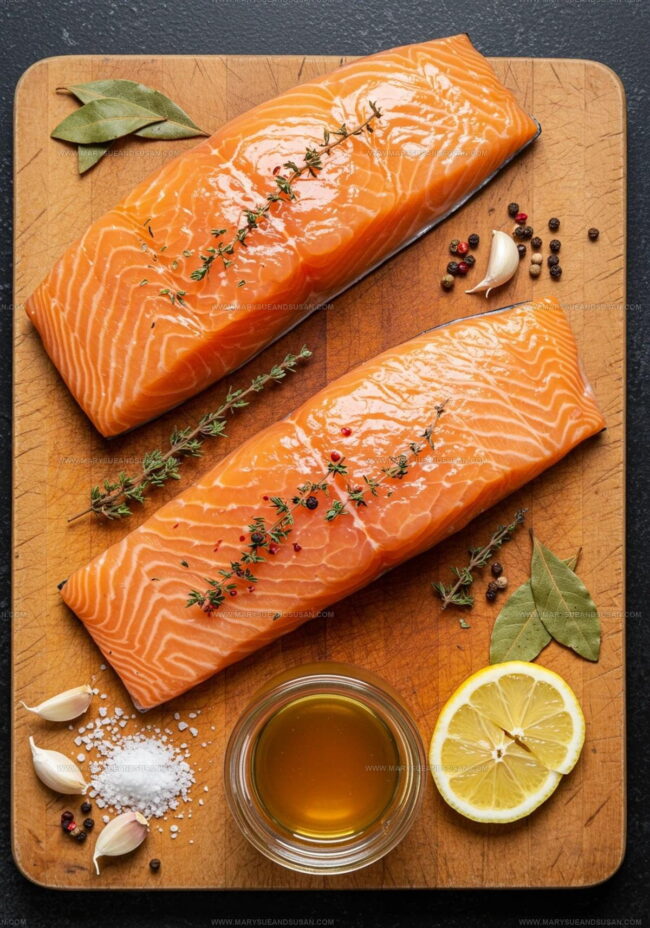
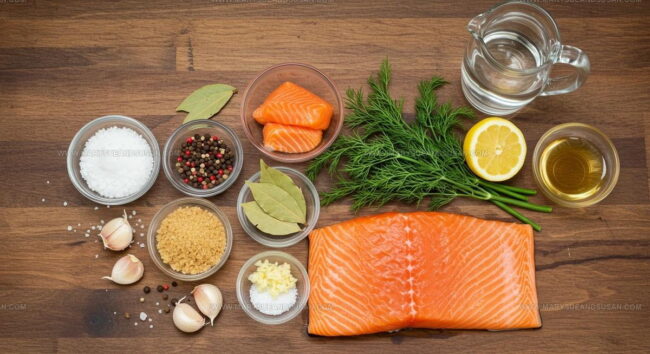
Ingredients Breakdown For Salmon Brine
Essential Kitchen Tools for Salmon Brine
How to Make Salmon Brine
Prepare Brine Base
Grab a large mixing bowl and pour in 2 cups of water. Add 1/4 cup kosher salt and 1/4 cup brown sugar. Whisk everything together until the salt and sugar completely dissolve into the water.
Add Flavor Boosters
Toss in your flavor enhancers to make the brine sing:
Let the mixture hang out for 5-10 minutes so all those tasty ingredients can get to know each other.
Choose Your Container
Select a container that’ll comfortably cradle your salmon. Make sure it’s non-reactive and large enough to fully submerge the fish.
Submerge the Salmon
Gently lower your salmon into the brine bath. If the fish wants to float, use a plate to keep it completely underwater.
Chill and Wait
Slide the container into the refrigerator. For salmon fillets, brine 8-12 hours. Larger cuts can hang out 12-24 hours. Set a timer to avoid turning your fish into a salt bomb.
Rinse and Clean
Pull the salmon from its salty swim. Rinse thoroughly under cold running water to wash away excess salt.
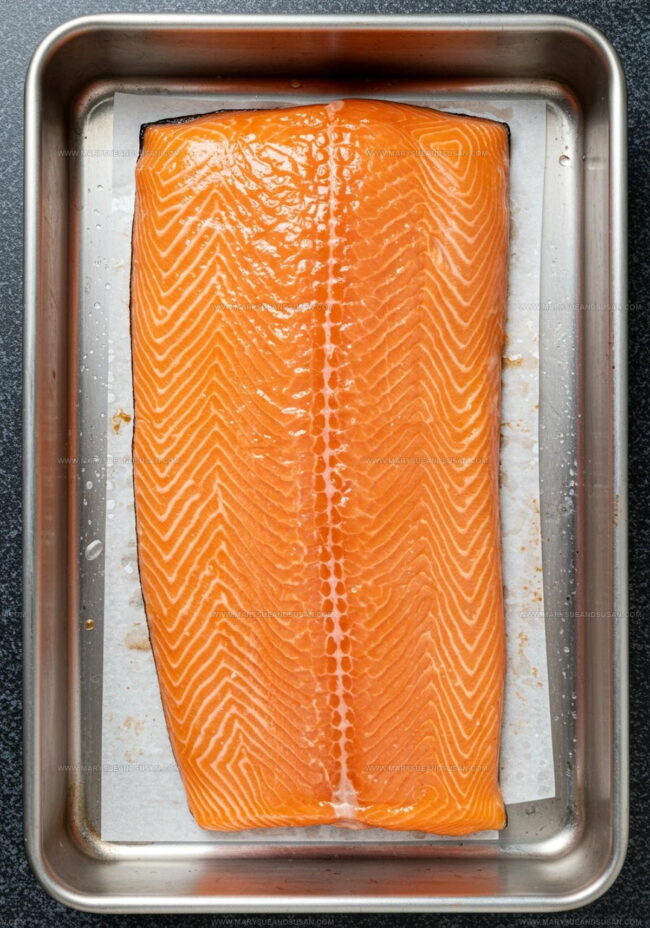
Dry and Prep
Use paper towels to pat the salmon completely dry. You’re aiming for a smooth, even surface.
Create Pellicle
Transfer the salmon to a wire rack in the refrigerator. Leave it uncovered for 4-6 hours. This creates a tacky surface that’ll help seasonings stick like glue when you’re ready to cook.
Extra Kitchen Insight For Salmon Brining
Flavor Variations for Salmon Brining
How To Use Salmon Brine At Serving Time
Storing Salmon Brine Safely
Salmon Brining Questions Explained
What does brining actually do to salmon?
Brining helps salmon absorb moisture and flavor, creating a more tender and seasoned fish that stays juicy during cooking.
Can saltwater fish be brined the same way as salmon?
Saltwater fish have different cellular structures, so salmon brining techniques won’t work exactly the same for other fish types.
Should water temperature matter when creating the brine?
Room temperature water works best for dissolving salt and sugar completely, ensuring even flavor distribution throughout the brine.
How salty will the salmon taste after brining?
When rinsed properly, your salmon won’t taste overly salty but will have a perfectly seasoned, balanced flavor profile.
Can table salt replace kosher salt in this recipe?
Kosher salt is recommended because its larger crystals dissolve differently, and table salt might make your brine too intense and salty.
What happens if salmon stays in brine too long?
Extended brining causes fish to become too salty and potentially mushy, breaking down protein structures and ruining texture.

Brine Recipe For Salmon
- Total Time: 12 to 28 hours and 15 minutes
- Yield: 4 1x
Description
Salmon transforms from ordinary to extraordinary with this simple brining technique. Soak your fresh salmon in a saltwater bath to lock in moisture and elevate the flavor profile for perfectly seasoned fish.
Ingredients
Main Ingredients:
- 2 cups water
- ¼ cup kosher salt
- ¼ cup brown sugar
Aromatics and Seasonings:
- 1 tablespoon black peppercorns
- 1 tablespoon crushed garlic
Optional Ingredients:
- 1–2 sprigs fresh dill
- ½ lemon, thinly sliced
Instructions
- Combine 2 cups water, ¼ cup kosher salt, and ¼ cup brown sugar in a large bowl. Whisk until salt and sugar completely dissolve.
- Add 1 tbsp black peppercorns, 1 tbsp crushed garlic, and optional herbs like fresh dill and lemon slices to the liquid mixture.
- Allow the brine to rest for 5-10 minutes so flavors can meld together before adding salmon.
- Select a non-reactive container large enough to hold your salmon completely submerged.
- Gently lower salmon into the brine, ensuring every part is covered by liquid. Use a plate to keep fish fully underwater if needed.
- Refrigerate salmon in brine for 8-12 hours for fillets, or 12-24 hours for larger cuts. Do not exceed recommended time to prevent over-salting.
- Remove salmon from brine and rinse thoroughly under cold running water to eliminate excess salt.
- Pat salmon completely dry with paper towels, creating a smooth surface.
- Place salmon on a wire rack in the refrigerator, uncovered, for 4-6 hours to develop a tacky pellicle that helps smoke adhere during cooking.
Notes
- Use kosher salt for the best brining results, as its larger crystals distribute more evenly and prevent over-salting your salmon.
- Experiment with flavor additions like fresh dill, orange zest, or maple syrup to customize your brine and create a unique taste profile.
- When rinsing the salmon, be gentle to avoid removing the delicate surface that will help smoke or seasonings stick during cooking.
- For those with dietary restrictions, substitute brown sugar with honey or maple syrup, and use low-sodium salt alternatives to manage sodium intake.
- Prep Time: 15 minutes
- Cook Time: 0 minutes
- Category: Salmon
- Method: Curing
- Cuisine: American
Nutrition
- Serving Size: 4
- Calories: 78 kcal
- Sugar: 13 g
- Sodium: 14500 mg
- Fat: 0 g
- Saturated Fat: 0 g
- Unsaturated Fat: 0 g
- Trans Fat: 0 g
- Carbohydrates: 14 g
- Fiber: 1 g
- Protein: 0 g
- Cholesterol: 0 mg
Susan Whitaker
Content Specialist & Home Cooking Guide
Expertise
Family-friendly Meals, Simple Healthy Cooking, Ingredient Substitutions, Beginner-friendly Recipes, Flexible Meal Prep
Education
Susan is the steady, practical guide at Mary Sue & Susan, bringing clarity, structure, and a warm sense of encouragement to every recipe she touches. Susan joined the site with a simple goal: help people cook with more confidence and less guesswork.