
Canned Chicken Pizza Crust Recipe for Protein-Packed Weeknight Dinners
Craving a canned chicken pizza crust that breaks the mold of traditional pizza-making? Unexpected ingredients can transform ordinary meals into something spectacular.
Quick and budget-friendly meals become exciting when home cooks experiment with clever shortcuts.
Convenience meets creativity in this simple yet satisfying recipe that promises maximum flavor with minimal effort.
Busy households will appreciate how streamlined cooking can still deliver delicious results.
Weeknight dinner solutions just got more interesting with this smart approach to pizza preparation.
Dive into a hassle-free cooking experience that proves simplicity never compromises taste.
What Makes Canned Chicken Pizza Crust So Clever

Ingredients Breakdown For Canned Chicken Pizza Crust
Main Protein Base:Binding Ingredient:Cheese Components:Seasoning Enhancers:Finishing Seasonings:Required Kitchen Tools for Canned Chicken Pizza Crust
How to Make Canned Chicken Pizza Crust
Warm Up the Oven
Set your oven to 400°F and grab a baking sheet. Line it with parchment paper so nothing sticks when you’re cooking.
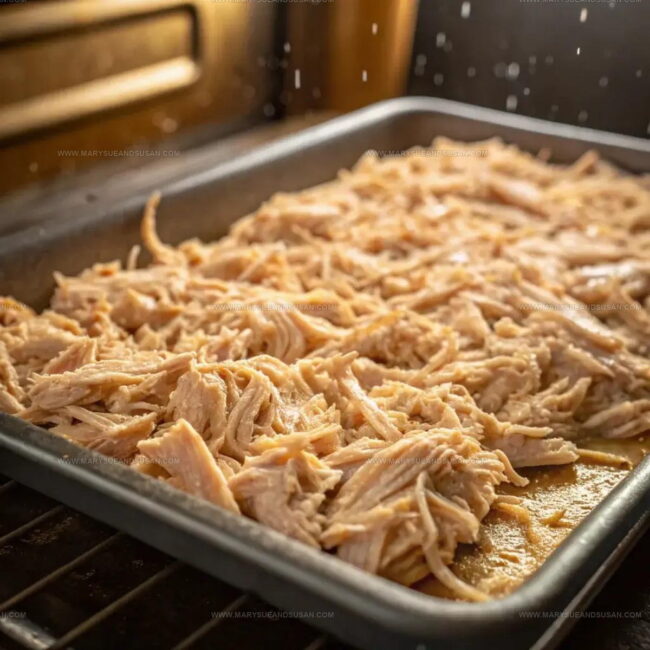
Dry Out the Chicken
Open that can of chicken and drain it super well. Spread the chicken on the baking sheet and pop it in the oven for 10 minutes. This trick helps make your crust crispy and solid.
Mix the Crust Base
Grab a mixing bowl and toss in your dried chicken. Then add:
Mix everything together until it feels like it wants to stick together.
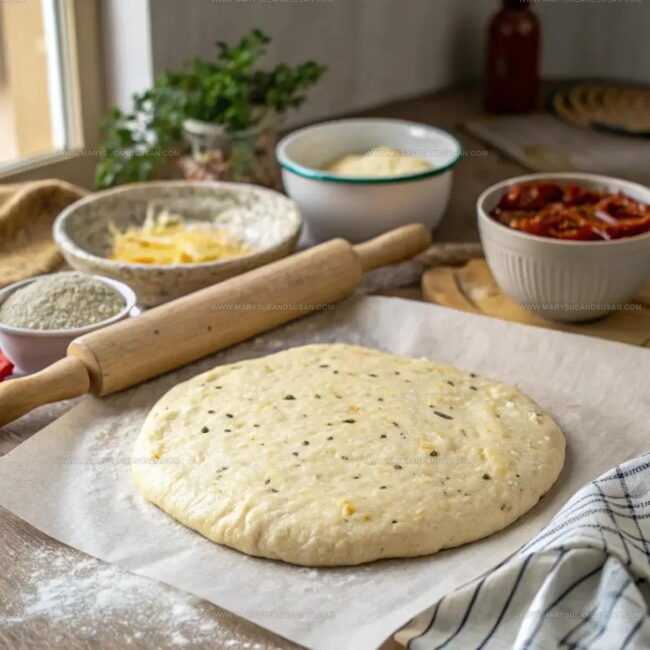
Shape Your Crust
Plop that chicken mixture onto your parchment paper. Use your hands to press it into a circle about 1/4 inch thick. Make it look like a real pizza crust – round and even.
First Bake
Slide the crust into the 400°F oven for 20 minutes. Watch for it to turn golden and feel firm when you tap it.
Dress Your Pizza
Pull the crust out and add your favorite pizza sauce and toppings. Don’t go crazy – too many toppings will make the crust soggy.
Final Bake
Return the pizza to the 400°F oven for another 10 minutes. The cheese should melt and get all bubbly.
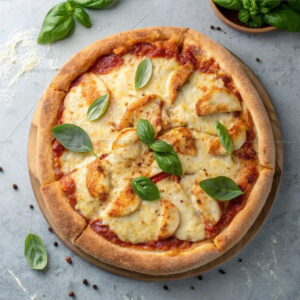
Slice and Serve
Let the pizza rest for a few minutes, then cut into slices. Enjoy your protein-packed pizza creation!
Kitchen Know-How For Canned Chicken Pizza Crust
Flavor Twists for Canned Chicken Pizza Crust
How To Serve Canned Chicken Pizza Crust
How To Store Chicken Pizza Crust
Canned Chicken Pizza Crust FAQs
Can I use fresh chicken instead of canned?
Fresh chicken works, but needs extra preparation. Drain and pat chicken completely dry, then shred or chop finely before following the recipe steps.
How crispy does the crust get?
The crust turns firm with crispy edges when baked correctly. Pressing the mixture thin and ensuring minimal moisture creates the best texture.
What cheese alternatives work best?
Cheddar and provolone blend nicely with mozzarella. Avoid soft cheeses that add extra moisture and could make the crust soggy.
Are there protein powder substitutions?
Avoid protein powder in this recipe. The egg and cheese provide necessary binding and texture for the chicken crust.
Can this crust be made ahead?
Prepare the crust and store it covered in the refrigerator for up to 24 hours before adding toppings and final baking.
How do I prevent a soggy center?
Ensure chicken is thoroughly drained and baked first. Use minimal sauce and avoid overloading with wet toppings to maintain crust structure.
Canned Chicken Pizza Crust Recipe
- Total Time: 55 minutes
- Yield: 2 1x
Description
Whipping up chicken pizza crust delivers a speedy dinner solution when your kitchen needs a quick meal. Crumbly canned chicken mixed with cheese and seasonings creates a protein-packed base that beats traditional pizza crusts hands down.
Ingredients
Main Ingredients:
- 1 can (12.5 ounces) cooked, shredded chicken
- 1 large egg
- ½ cup shredded mozzarella cheese
Seasonings:
- ¼ teaspoon garlic powder
- ¼ teaspoon Italian seasoning
Finishing Ingredients:
- Salt, to taste
- Freshly ground black pepper, to taste
Instructions
- Drain the 12.5 oz can of chicken completely. Pat the meat dry with paper towels to remove excess moisture.
- Spread the chicken on a baking sheet. Dry it out at 400°F for 10 minutes to improve your crust’s texture.
- Grab a medium bowl and mix ½ cup mozzarella, 1 large egg, ¼ teaspoon garlic powder, and ¼ teaspoon Italian seasoning with the chicken. Blend until the mixture feels cohesive.
- Transfer the chicken mixture onto parchment-lined baking sheet. Press it into a thin, even circle about ¼ inch thick using your hands.
- Bake the bare crust at 400°F for 20 minutes until the edges turn golden and the surface feels firm when touched.
- Pull the crust from the oven. Spread your preferred pizza sauce across the surface, leaving a small border around the edges.
- Sprinkle additional cheese and desired toppings over the sauce. Keep the toppings light to maintain the crust’s structure.
- Return the pizza to the 400°F oven. Bake for 10 more minutes until the cheese melts completely and looks bubbly.
- Remove from the oven and let the pizza rest for 3-4 minutes. Slice into wedges and serve hot.
Notes
- Check the canned chicken’s moisture level carefully, as too much liquid can make the crust soggy and prevent proper crisping.
- Use a clean kitchen towel or paper towels to press out extra moisture from the canned chicken before baking to ensure a firmer crust texture.
- For a crispier base, consider using a pizza stone or preheating a baking sheet to create a hotter cooking surface that helps firm up the bottom of the crust.
- Experiment with different cheese blends like a mix of mozzarella and parmesan to enhance the flavor and help bind the crust together more effectively.
- Prep Time: 15 minutes
- Cook Time: 40 minutes
- Category: Chicken
- Method: Baking
- Cuisine: American
Nutrition
- Serving Size: 2
- Calories: 291 kcal
- Sugar: 0 g
- Sodium: 605 mg
- Fat: 16 g
- Saturated Fat: 7 g
- Unsaturated Fat: 8 g
- Trans Fat: 0 g
- Carbohydrates: 1 g
- Fiber: 0 g
- Protein: 38 g
- Cholesterol: 168 mg
Mary Sue
Founder & Creative Recipe Developer
Expertise
Comfort Food Twists, Seasonal Cooking, Creative Flavor Pairings, Easy Weeknight Dinners, Flexible Pantry Cooking
Education
Mary Sue is the playful, creative recipe mind behind Mary Sue & Susan, known for big flavor ideas, warm storytelling, and dishes that feel both comforting and a little unexpected. She has a talent for taking familiar meals and giving them just enough personality to make them memorable.