Crispy Chicken Kiev Recipe With Buttery Center
Chicken Kiev adds an impressive dinner that feels special without requiring advanced cooking skills.
This classic dish combines elegance with comfort, making it perfect for date nights or whenever you want to create something memorable at home.
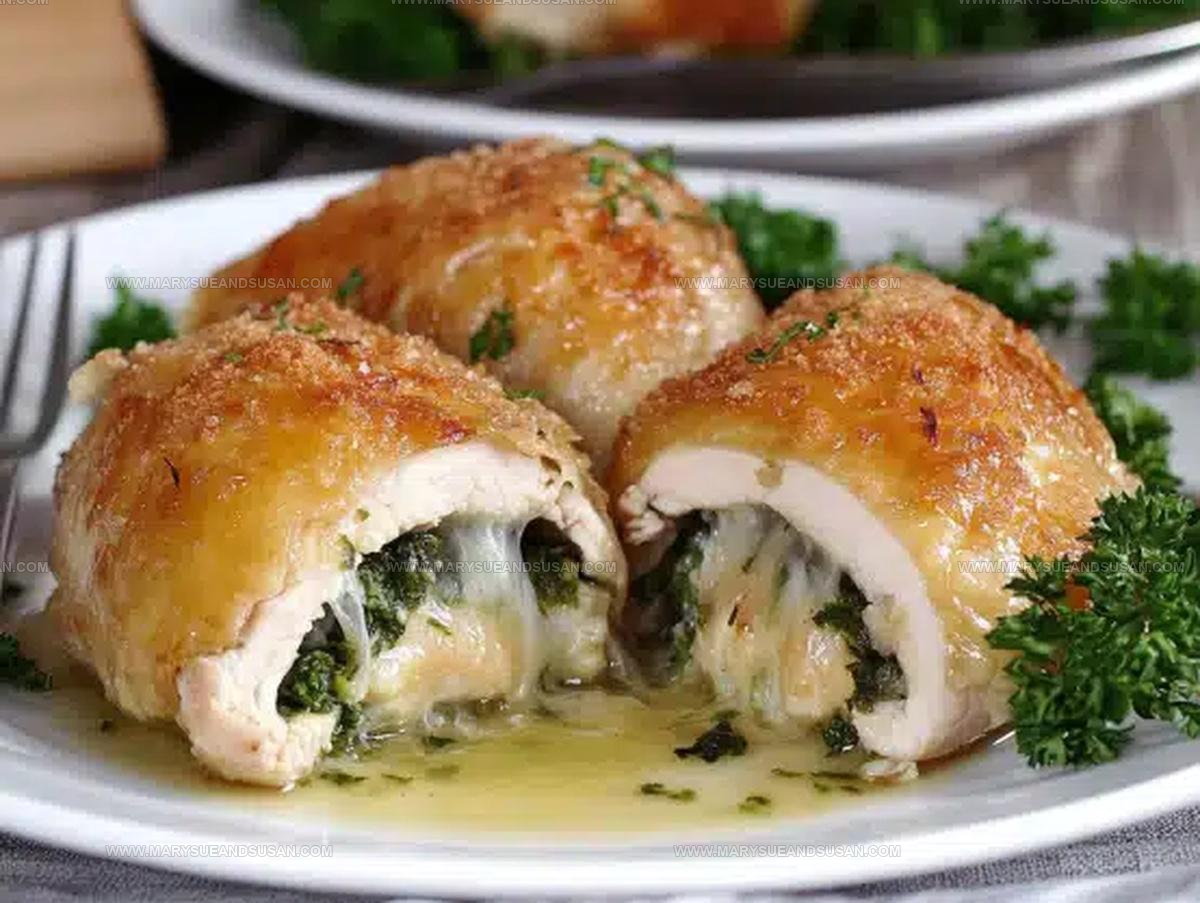
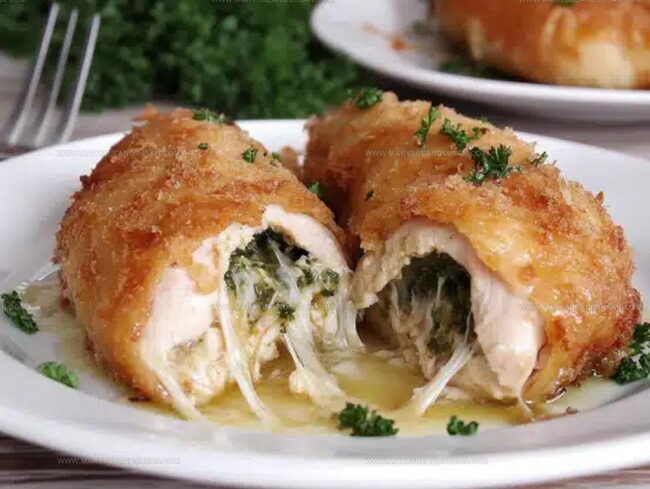
The crispy golden exterior and rich, savory center have made this Eastern European favorite beloved worldwide.
People often assume such a sophisticated meal demands hours in the kitchen, but the process is surprisingly straightforward once you know the technique.
Every mouthful offers a satisfying contrast of textures that makes every plate feel like a celebration.
Restaurants may charge premium prices for this dish, yet making it yourself proves far more rewarding.
Prepare to impress everyone at the table with a meal that looks as stunning as it tastes.
Secrets Behind the Legendary Herb-Butter Center of Classic Chicken Kiev
Garlic Butter Chicken And Savory Coating Essentials

Pans Tongs and Tools for Chicken Kiev Prep
Method for Stuffing, Sealing, and Frying Chicken Kiev
Prepare Garlic Herb Butter
Grab a bowl and mix together these ingredients:
Shape the butter mixture into a neat log using plastic wrap and tuck it in the refrigerator for 30 minutes to firm up.
Flatten Chicken Breasts
Place each chicken breast between plastic wrap sheets and gently pound until they’re about 1/4 inch thick. Sprinkle both sides with salt, black pepper, and paprika to add some flavor.
Create Butter-Filled Chicken Rolls
Take your chilled butter log and slice it into 4 equal pieces. Center one butter piece in each chicken breast.
Carefully fold the edges over the butter and roll tightly, making sure no butter can escape.
Wrap each roll in plastic and refrigerate for 30 minutes to help them keep their shape.
Set Up Breading Station
Arrange three shallow dishes for your breading adventure:
Dip each chicken roll first in flour, then egg, and finally coat completely with seasoned breadcrumbs.
Fry to Golden Perfection
Heat 1 cup vegetable oil in a large skillet over medium-high heat (375°F).
Carefully place the breaded chicken rolls in the hot oil and fry for 3-4 minutes per side until they turn a beautiful golden brown.
Transfer to a paper towel-lined plate to drain excess oil.
Ensure Complete Cooking
For extra peace of mind, slide the fried chicken rolls into a baking dish and bake at 350°F (175°C) for 10-12 minutes.
Serve and Savor
Let the chicken rest for 5 minutes before slicing. Plate with your favorite sides like creamy mashed potatoes, steamed vegetables, or a crisp green salad. Enjoy your homemade Chicken Kiev!
Butter Containment Tips for Clean Slices
Classic Herby Variations Of Authentic Chicken Kiev
Classic Herby Main Presentations For Chicken Kiev
Classic Herby Poultry Freshness Standards For Chicken Kiev
Everything to Know About Mastering Traditional Chicken Kiev
What makes the butter mixture special?
The garlic herb butter adds incredible flavor and creates a rich, melting center when cooked. Combining fresh herbs, garlic, and lemon juice creates a delicious filling that bursts out when you cut into the chicken.
Can I prepare the chicken rolls ahead of time?
Absolutely. You can assemble the chicken rolls and keep them refrigerated for up to 24 hours before breading and cooking. This makes meal prep super convenient for busy days.
How do I prevent the butter from leaking?
Seal the chicken rolls tightly, ensuring no openings. Chilling the rolls helps the butter firm up and stay inside during cooking. Careful wrapping is key to keeping the butter contained.
What if I don’t have fresh herbs?
Dried herbs work perfectly fine. Use about 1/3 the amount of dried herbs compared to fresh, as they’re more concentrated in flavor. The dish will still taste fantastic.
Is it necessary to finish in the oven?
The optional oven step ensures the chicken cooks through completely and helps achieve an even golden color. If your chicken is perfectly golden when frying, you can skip this step.
Can I use chicken thighs instead of breasts?
Chicken breasts work best for this recipe because they’re easier to flatten and roll. Thighs might be harder to flatten evenly and won’t roll as neatly, making them less ideal for this technique.

Classic Stuffed Chicken Kiev Recipe
- Total Time: 1 hour 33-35 minutes
- Yield: 4 1x
Description
Chicken Kiev from Ukraine brings pure comfort right to your dinner table. Crispy golden breading holds a hidden core of herb-infused butter that melts perfectly when sliced, creating a delightful sauce that drips across your plate.
Ingredients
Main Proteins:
- 4 boneless, skinless chicken breasts
Breading and Coating:
- 1 cup all-purpose flour
- 1 12 cups breadcrumbs (panko or regular)
- 2 large eggs, beaten
Butter and Seasonings:
- ½ cup unsalted butter, softened
- 2 cloves garlic, minced
- 1 tablespoon fresh parsley, chopped
- 1 tablespoon fresh dill, chopped (optional)
- 1 tablespoon lemon juice
- 1 teaspoon salt
- ½ teaspoon black pepper
- 1 teaspoon paprika
- ½ teaspoon salt
- ¼ teaspoon black pepper
- 1 cup vegetable oil (or as needed)
Instructions
- Combine 12 cup softened butter, 2 minced garlic cloves, 1 tablespoon chopped parsley, 1 tablespoon chopped dill, 1 tablespoon lemon juice, 12 teaspoon salt, and 14 teaspoon black pepper in a mixing bowl. Create a log using plastic wrap and refrigerate for 30 minutes until firm.
- Place 4 chicken breasts between plastic wrap and pound until 14 inch thick. Season each side with 1 teaspoon salt, 12 teaspoon black pepper, and 1 teaspoon paprika.
- Slice the chilled butter log into 4 equal pieces. Center one butter piece on each chicken breast. Carefully fold edges over butter, rolling tightly to seal completely.
- Wrap each chicken roll in plastic and refrigerate for 30 minutes to maintain shape.
- Prepare three shallow bowls: first with 1 cup flour, second with 2 beaten eggs, third with 1 12 cups breadcrumbs mixed with 12 teaspoon salt and 14 teaspoon black pepper.
- Dredge each chicken roll through flour, then egg, then breadcrumb mixture, ensuring total coverage.
- Heat 1 cup vegetable oil in a large skillet over medium-high heat at 375°F. Carefully place breaded chicken rolls in hot oil.
- Fry chicken for 34 minutes per side until golden brown and crispy. Internal temperature should reach 165°F.
- Transfer fried chicken to a paper towel-lined plate to drain excess oil.
- Optional: Bake chicken rolls in a 350°F preheated oven for 1012 minutes for extra doneness.
- Allow chicken to rest 5 minutes before slicing. Serve immediately with your favorite accompaniments.
Notes
- Chill the butter mixture thoroughly to help it stay inside the chicken during cooking and prevent leaking.
- Use a meat thermometer to check that chicken reaches 165°F internally for safe consumption.
- Seal chicken rolls tightly and refrigerate before breading to help maintain their shape and prevent butter from escaping during frying.
- For a gluten-free version, swap regular breadcrumbs with almond flour or gluten-free panko crumbs and use cornstarch instead of wheat flour.
- Prep Time: 1 hour 15 minutes
- Cook Time: 18-20 minutes
- Category: Chicken
- Method: Frying
- Cuisine: Ukrainian
Nutrition
- Serving Size: 4
- Calories: 690 kcal
- Sugar: 0 g
- Sodium: 570 mg
- Fat: 50 g
- Saturated Fat: 27 g
- Unsaturated Fat: 21 g
- Trans Fat: 0.5 g
- Carbohydrates: 28 g
- Fiber: 1.5 g
- Protein: 40 g
- Cholesterol: 160 mg
Mary Sue
Founder & Creative Recipe Developer
Expertise
Comfort Food Twists, Seasonal Cooking, Creative Flavor Pairings, Easy Weeknight Dinners, Flexible Pantry Cooking
Education
Mary Sue is the playful, creative recipe mind behind Mary Sue & Susan, known for big flavor ideas, warm storytelling, and dishes that feel both comforting and a little unexpected. She has a talent for taking familiar meals and giving them just enough personality to make them memorable.