
Chicken Chimichangas Recipe with a Crispy Golden Shell
Crispy chicken chimichangas bring the fun and flavor of Tex-Mex comfort food right to the dinner table any night of the week.
There's something wonderfully satisfying about that golden, crunchy exterior giving way to a warm, savory filling that makes everyone come back for seconds.
Whether you need a weeknight winner or something special for casual gatherings, this dish delivers big on taste without requiring fancy skills or hours in the kitchen.
The beauty here is how it feels like restaurant dining at home, but you control everything that goes inside.
Kids go wild for them, and adults appreciate how filling and flavorful they are without being complicated.
The recipe comes together faster than ordering takeout, and the results always impress.
Ready to make dinner exciting again?
Best Reasons to Try Chicken Chimichangas

Chimichanga Filling Elements To Ready
Main Protein:Cheese And Dairy:Flavor Enhancers:Wrapper And Cooking Medium:Tools That Aid Rolling And Crisping Chimichangas
How to Cook Chicken Chimichangas
Mix the Filling
Grab a large bowl and toss in 2 cups of shredded chicken. Add 1 cup of shredded cheddar cheese, ⅓ cup sour cream, 1 can (4 oz) of diced green chilies, 1 teaspoon garlic powder, and 1 teaspoon ground cumin. Sprinkle in some salt and pepper. Mix everything until your filling looks creamy and well-blended.
Warm the Tortillas
Pop your 6 large flour tortillas in the microwave for 15-20 seconds. This trick makes them super flexible so they won’t crack when folding. Warm tortillas are way easier to work with.
Create the Chimichanga Rolls
Scoop about ½ cup of filling right into the center of each tortilla. Fold in the sides, then roll from the bottom up, creating a tight little package. Make sure each chimichanga is sealed well so nothing leaks out during cooking.
Baking Method
Arrange your rolled chimichangas seam-side down on a parchment-lined baking sheet. Brush each one lightly with vegetable oil. Slide the baking sheet into an oven preheated to 400°F (200°C). Bake for 20-25 minutes, flipping halfway through until they turn a gorgeous golden brown.
Frying Alternative
If frying is more your style, heat 1 inch of vegetable oil in a deep skillet over medium heat. Carefully place chimichangas seam-side down and fry for 2-3 minutes per side until they reach a crispy, deep golden color. Let them drain on paper towels to remove extra oil.
Dress and Serve
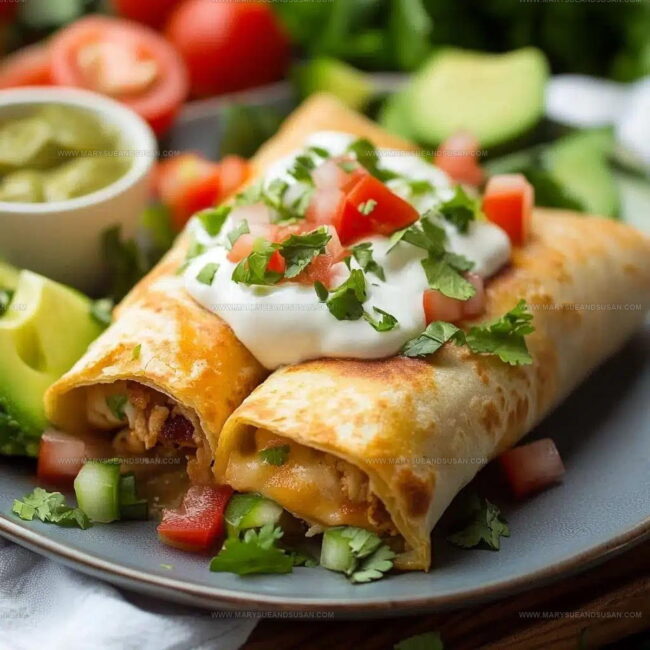
Time to add your favorite toppings! Dollop on some sour cream, sprinkle fresh salsa, add a scoop of guacamole, or scatter some diced tomatoes and shredded lettuce. Serve these hot and watch them disappear fast.
Touches That Add Creaminess Or Heat
New Ways To Style Chicken Chimichangas
Meals That Welcome A Cheesy Chimichanga
Preserving Crunch After Cooking
Chimichanga Questions People Ask
Can I use rotisserie chicken for the filling?
Absolutely! Rotisserie chicken makes the recipe super quick and adds fantastic flavor. Shred it finely, and the filling comes together in minutes.
What if my tortillas crack when folding?
Warm tortillas are more flexible. Microwave them for 15-20 seconds and handle gently. If they still crack, work slower and fold carefully to keep the filling secure.
Are chimichangas supposed to be crispy?
Definitely! Chimichangas get their signature crunch from frying or baking. Brush with oil and cook at high heat to achieve that golden, crispy exterior we all crave.
Can chimichangas be made ahead of time?
Prepare the filled chimichangas, then refrigerate for several hours before cooking. They hold together perfectly and cook beautifully when ready to serve.
How do chimichangas differ from burritos?
Chimichangas are deep-fried or baked until crispy, while burritos are typically soft and served uncooked. The cooking method creates that delicious, crunchy texture.
What cheese works best in this recipe?
Monterey Jack or cheddar cheese melt beautifully and add fantastic flavor, creating a rich, gooey filling inside your crispy chicken chimichangas.
Crispy Baked Chicken Chimichangas Recipe
- Total Time: 30-35 minutes (baked) or 16-19 minutes (fried)
- Yield: 6 1x
Description
Golden Chicken Chimichangas are my go-to dinner when friends come over for a casual meal. Packed with juicy shredded chicken, melted cheese, and a crispy exterior, these little bundles of deliciousness never disappoint at my table.
Ingredients
Protein and Cheese:
- 2 cups cooked and shredded chicken
- 1 cup shredded cheddar cheese
Seasonings and Moisture:
- ⅓ cup sour cream
- 1 (4 oz/113 g) can diced green chilies
- 1 teaspoon garlic powder
- 1 teaspoon ground cumin
- Salt
- Pepper
Wrapping and Cooking:
- 6 large flour tortillas
- Vegetable oil
Instructions
- Craft a zesty chicken mixture by blending 2 cups shredded chicken, 1 cup cheddar cheese, ⅓ cup sour cream, 4 ounces diced green chilies, 1 teaspoon garlic powder, 1 teaspoon cumin, plus salt and pepper in a large bowl until thoroughly combined.
- Heat 6 large flour tortillas in the microwave for 15 seconds to soften and prevent cracking when folding.
- Distribute ½ cup of chicken mixture precisely in the center of each tortilla, carefully folding sides inward and rolling tightly to create sealed packages.
- For baking, arrange rolled chimichangas seam-side down on a parchment-lined baking sheet, brushing each with 1 tablespoon vegetable oil.
- Bake at 400°F (200°C) for 22-25 minutes, rotating the pan halfway through cooking to ensure even golden-brown crispness.
- Alternatively, heat 1 inch of oil in a deep skillet to 350°F (175°C) and fry chimichangas for 2-3 minutes per side until achieving a deep golden exterior.
- Transfer fried chimichangas onto paper towels to absorb excess oil and drain.
- Garnish with optional toppings like fresh salsa, chopped cilantro, diced tomatoes, or additional sour cream before serving immediately.
Notes
- Handling tortillas gently prevents tearing, so warm them slightly to increase flexibility before filling.
- Creating a tight seal when rolling prevents the filling from leaking during cooking, so fold sides in first and roll snugly.
- Draining fried chimichangas on paper towels helps remove excess oil and keeps the exterior crispy.
- Experiment with different protein fillings like beef, pork, or black beans to customize the recipe for various dietary preferences.
- Prep Time: 10 minutes
- Cook Time: 20-25 minutes (baked) or 6-9 minutes (fried)
- Category: Chicken
- Method: Frying
- Cuisine: Mexican
Nutrition
- Serving Size: 6
- Calories: 482 kcal
- Sugar: 2 g
- Sodium: 620 mg
- Fat: 28 g
- Saturated Fat: 11 g
- Unsaturated Fat: 15 g
- Trans Fat: 0.5 g
- Carbohydrates: 32 g
- Fiber: 3 g
- Protein: 28 g
- Cholesterol: 70 mg
Susan Whitaker
Content Specialist & Home Cooking Guide
Expertise
Family-friendly Meals, Simple Healthy Cooking, Ingredient Substitutions, Beginner-friendly Recipes, Flexible Meal Prep
Education
Susan is the steady, practical guide at Mary Sue & Susan, bringing clarity, structure, and a warm sense of encouragement to every recipe she touches. Susan joined the site with a simple goal: help people cook with more confidence and less guesswork.