Crispy Chicken Katsu Recipe

Crunchy Chicken Katsu Recipe With Golden Breading

Crispy Chicken Katsu Recipe serves up one of Japan's most beloved comfort foods that has won hearts around the world.

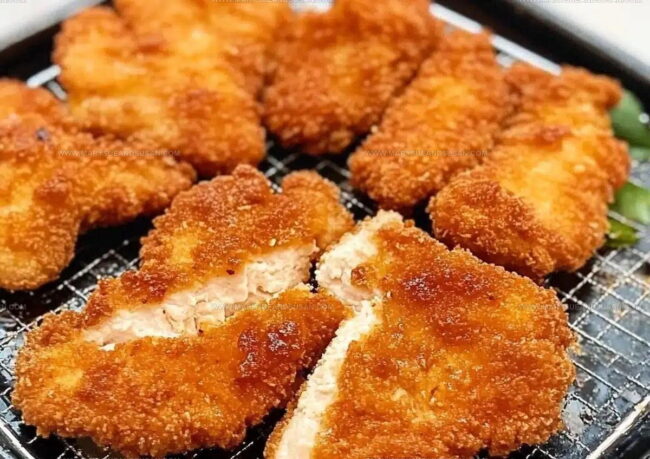
Golden panko-coated cutlets deliver satisfying crunch in every bite while staying incredibly juicy inside.

Busy weeknights become special when something so delicious comes together quickly in any home kitchen.

Families gather around the table for a meal that feels like dining out but costs a fraction of the price.

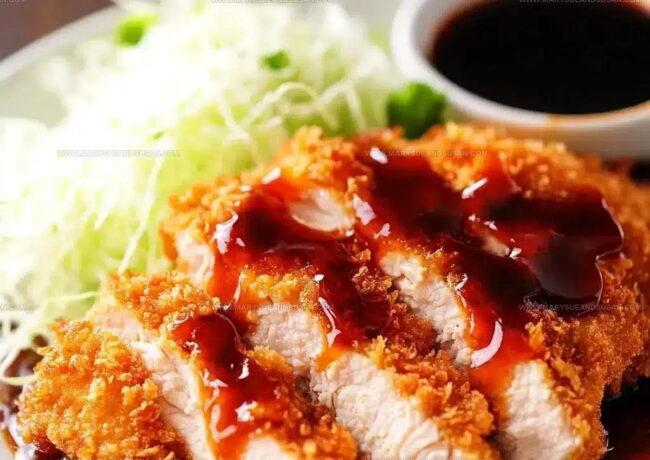
Pairing perfectly with rice and shredded cabbage, it satisfies cravings for something both hearty and refreshing.

The combination of textures makes every mouthful exciting, and you can adjust portions to feed however many people are joining for dinner.

Make tonight memorable with a dish that turns ordinary evenings into something worth celebrating.

Why Chicken Katsu Is a Classic Favorite

Why Chicken Katsu Is a Classic Favorite
  • Easy Breading: Creating a crispy coating for chicken becomes simple with this three-step breading method that guarantees a perfect golden crunch every single time.
  • Family Crowd-Pleaser: Serving this dish brings smiles to the table, as kids and adults both adore the satisfying crunch and familiar flavor of breaded chicken.
  • Quick Weeknight Dinner: Transforming plain chicken into a restaurant-quality meal happens fast, making this recipe perfect for busy households needing a reliable dinner solution.
  • Flexible Side Options: Pairing the chicken with rice, cabbage, or tonkatsu sauce lets your family customize the meal to match their taste preferences easily.

Chicken Katsu Ingredient Breakdown

Main Protein:
  • Chicken Breasts (2 boneless, skinless): Lean protein that becomes the star of this crispy dish. Choose fresh, evenly sized breasts for consistent cooking.
Seasoning:
  • Salt (to taste), Pepper (to taste): Fundamental flavor enhancers that bring out the chicken’s natural taste. Sprinkle generously to add depth to each bite.
Breading Components:
  • All-Purpose Flour (1/2 cup): Creates the first layer of coating that helps eggs and breadcrumbs stick perfectly. Thin and even coating ensures maximum crispiness.
  • Large Eggs (2, beaten): Serves as the glue between flour and breadcrumbs. Whisking thoroughly helps create a smooth binding layer.
  • Panko Breadcrumbs (1 cup): Provides the signature crunchy exterior that makes this dish irresistible. These Japanese-style breadcrumbs deliver superior crispness.
Cooking Ingredient:
  • Vegetable Oil (1 tablespoon): Enables perfect frying and golden-brown exterior. Use just enough to create a thin layer in the pan.
Serving Accompaniments:
  • Tonkatsu Sauce (for serving): Traditional Japanese condiment that adds tangy sweetness. Drizzle generously alongside the crispy chicken.
  • Steamed Rice (optional), Shredded Cabbage (optional): Classic side dishes that complement the chicken katsu beautifully.

Tools Used for Crispy Chicken Katsu

  • Large Skillet: Your go-to pan for getting that perfect golden-brown crispy chicken, preferably 10-12 inches wide for even cooking.
  • Meat Thermometer: Essential tool to check your chicken reaches a safe 165°F without cutting into the meat and losing those delicious juices.
  • Three Shallow Bowls: Crucial for creating your breading station – one for flour, one for eggs, and one for panko breadcrumbs.
  • Paper Towel-Lined Plate: Helps drain excess oil and keeps your crispy chicken from getting soggy after frying.
  • Cutting Board: Where you’ll slice your chicken breasts horizontally and later cut the cooked katsu into strips.
  • Sharp Kitchen Knife: Needed for slicing chicken breasts and cutting the finished katsu into neat serving pieces.
  • Tongs: Perfect for safely placing chicken into hot oil and flipping the cutlets without splashing.
  • Measuring Cups/Spoons: Helpful for ensuring consistent seasoning and breading amounts.

Chicken Katsu Cooking Method

Chicken Katsu Cooking Method
1

Prepare Chicken Cutlets

Grab those 2 boneless, skinless chicken breasts and sprinkle salt and pepper all over both sides. If the chicken looks thick, slice each breast horizontally to create thinner cutlets that’ll cook evenly.

2

Create Breading Stations

Set up three shallow bowls on your counter. Here’s how to arrange them:

  • 1/2 cup all-purpose flour in the first bowl
  • 2 large eggs (beaten well) in the second bowl
  • 1 cup panko breadcrumbs in the third bowl
3

Coat Chicken

Take each chicken piece and roll it through your stations. First, dust it completely in flour, shaking off any excess. Then dunk it into the beaten eggs, making sure every inch gets covered. Finally, press it into the panko breadcrumbs, ensuring a super crispy coating sticks to every surface.

4

Heat Cooking Pan

Pour 1 tablespoon vegetable oil into a large skillet. Warm it over medium heat until the temperature reaches exactly 350°F. The oil should be hot but not smoking.

5

Fry Chicken Cutlets

Carefully slide your breaded chicken into the hot oil. Cook for 3-4 minutes on the first side until it turns a beautiful golden brown. Flip and cook the other side for another 3-4 minutes. Check the internal temperature with a meat thermometer – you want it to hit exactly 165°F.

6

Rest and Serve

Transfer the crispy chicken to a plate lined with paper towels to drain extra oil. Slice the cutlets into strips and serve with tonkatsu sauce. A side of steamed rice and shredded cabbage makes this meal complete.

Extra Insight for Chicken Katsu

  • Chicken Thickness: Slice chicken breasts horizontally to ensure even, quick cooking and maximum crispiness for your katsu.
  • Breading Technique: Press panko breadcrumbs firmly onto each chicken piece, creating a thick, crunchy coating that will turn beautifully golden.
  • Oil Temperature: Check your oil temperature with a thermometer or drop a breadcrumb in—it should sizzle immediately but not burn, ensuring perfect crispiness.
  • Draining Excess Oil: Let your freshly fried chicken rest on paper towels to remove extra grease and maintain that crisp texture everyone loves.
  • Sauce Pairing: Drizzle tonkatsu sauce over your chicken or serve on the side for dipping, adding a tangy flavor that complements the crispy exterior.

Creative Variations for Chicken Katsu

  • Gluten-Free Crispy Chicken: Replace wheat flour with rice flour or almond flour, and use gluten-free panko breadcrumbs to make the entire dish safe for those with gluten sensitivities.
  • Baked Lighter Version: Skip frying and instead spray the breaded chicken with cooking spray, then bake on a wire rack at 400°F for 20-25 minutes, turning once halfway through for even crispiness.
  • Spicy Korean-Style Chicken: Add gochugaru (Korean red pepper flakes) to the breadcrumb mixture and serve with gochujang sauce instead of traditional tonkatsu sauce for a spicier kick.
  • Air Fryer Quick Chicken: Cook the breaded chicken in an air fryer at 375°F for 10-12 minutes, flipping halfway, which cuts down on oil and creates an equally crispy exterior.

What Pairs Well With Chicken Katsu

What Pairs Well With Chicken Katsu
  • Perfect Portion Control: Serve one chicken katsu cutlet per person, which typically covers a hearty main course for dinner.
  • Rice Companion: Spread steamed white rice beside the crispy cutlet, letting the golden breading contrast beautifully with the soft grains.
  • Sauce Pairing: Drizzle tangy tonkatsu sauce generously over your chicken, or serve it in a small dipping bowl for a classic Japanese restaurant experience.
  • Fresh Side Kick: Toss some thinly sliced cabbage with a light vinegar dressing to create a crisp, refreshing complement that cuts through the fried chicken’s richness.

Best Storage Practices For Chicken Katsu

  • Refrigerate leftover crispy chicken katsu in an airtight container for up to 3 days, keeping the crunch by placing a paper towel underneath to absorb moisture.
  • Freeze uncooked breaded cutlets between sheets of parchment paper inside a freezer bag, which lets your chicken stay fresh for about a month before cooking.
  • Reheat refrigerated katsu in the oven at 375°F for 10 minutes to maintain the original crispy texture, avoiding the microwave that can make the breading soggy.
  • Store unused panko breadcrumbs in a sealed container in your pantry, protecting them from humidity to keep them perfectly dry and crisp for future cooking.
FAQ

Can I use different cuts of chicken?

Absolutely! Chicken thighs work great and often stay juicier than breast meat. Just ensure they’re pounded to an even thickness for consistent cooking.

FAQ

What if I can’t find panko breadcrumbs?

Regular breadcrumbs can work, but they won’t give the same ultra-crispy texture. Check Asian grocery stores or larger supermarkets for panko.

FAQ

How do I keep the breading from falling off during frying?

Make sure to press the panko firmly onto your chicken and let the coated pieces rest for a few minutes before frying. The flour and egg create a sticky base that helps breadcrumbs adhere.

FAQ

Is there a way to make this healthier?

Try baking the chicken in a hot oven at 425°F, spraying with cooking spray to help achieve crispiness. The texture won’t be identical to frying, but it reduces oil usage.

FAQ

Can I prepare the chicken ahead of time?

Bread the chicken and refrigerate up to 4 hours before cooking. Don’t leave breaded chicken out at room temperature, as bacteria can develop quickly.

Print
clock clock iconcutlery cutlery iconflag flag iconfolder folder iconinstagram instagram iconpinterest pinterest iconfacebook facebook iconprint print iconsquares squares iconheart heart iconheart solid heart solid icon
Crispy Chicken Katsu Recipe

Crispy Chicken Katsu Recipe


5 Stars 4 Stars 3 Stars 2 Stars 1 Star

4.7 from 38 reviews

  • Total Time: 23 minutes
  • Yield: 2 1x

Description

Crispy Chicken Katsu delivers golden, crunchy perfection straight from Japanese kitchens to your dinner table. Tender chicken coated in panko breadcrumbs creates a satisfying meal that brings restaurant-style flavor right to your home cooking.


Ingredients

Scale

Proteins:

  • 2 boneless, skinless chicken breasts

Dry Coating Ingredients:

  • ½ cup all-purpose flour
  • 1 cup panko breadcrumbs

Wet and Seasoning Ingredients:

  • 2 large eggs
  • 1 tablespoon vegetable oil
  • Salt
  • Pepper
  • Tonkatsu sauce

Instructions

  1. Slice 2 chicken breasts horizontally to create thinner cutlets. Generously sprinkle both sides with ½ teaspoon salt and ¼ teaspoon black pepper.
  2. Arrange 3 shallow bowls for breading. Fill the first with ½ cup flour, the second with 2 beaten eggs, and the third with 1 cup panko breadcrumbs.
  3. Thoroughly coat each chicken cutlet in flour, shaking off excess. Dunk completely into beaten eggs, then press firmly into panko until fully covered.
  4. Pour 1 tablespoon vegetable oil into a large skillet. Heat to 350°F over medium heat. Test temperature with a breadcrumb – it should sizzle immediately.
  5. Carefully place breaded cutlets into hot oil. Fry for 3-4 minutes until bottom turns golden brown. Flip and cook opposite side for another 3-4 minutes.
  6. Check internal chicken temperature reaches 165°F using a meat thermometer. Remove cutlets from skillet and place on paper towel-lined plate.
  7. Let chicken rest for 2-3 minutes to drain excess oil. Slice into diagonal strips. Serve immediately with tonkatsu sauce on the side.

Notes

  • Use a meat mallet to pound chicken breasts to an even thickness, helping them cook uniformly and create a tender texture.
  • Keep the breading process neat by using one hand for dry ingredients and another for wet to prevent clumping on your fingers.
  • Check oil temperature with a wooden chopstick or thermometer to ensure perfect crispiness without burning the breading.
  • For a gluten-free version, substitute all-purpose flour with rice flour and use gluten-free panko breadcrumbs to maintain the classic crispy coating.
  • Prep Time: 15 minutes
  • Cook Time: 8 minutes
  • Category: Chicken
  • Method: Frying
  • Cuisine: Japanese

Nutrition

  • Serving Size: 2
  • Calories: 490 kcal
  • Sugar: 3 g
  • Sodium: 460 mg
  • Fat: 22 g
  • Saturated Fat: 4 g
  • Unsaturated Fat: 17 g
  • Trans Fat: 0 g
  • Carbohydrates: 38 g
  • Fiber: 2 g
  • Protein: 38 g
  • Cholesterol: 190 mg
Susan Whitaker

Susan Whitaker

Content Specialist & Home Cooking Guide

Expertise

Family-friendly Meals, Simple Healthy Cooking, Ingredient Substitutions, Beginner-friendly Recipes, Flexible Meal Prep

Education

Saint Paul College
  • Program: Culinary Arts Diploma
  • Focus: Trained in a hands-on professional kitchen environment with coursework spanning core culinary technique, pastry, butchery, charcuterie, food safety, sanitation, restaurant operations, and the nutritional side of healthy cooking, with real-world practice tied to the college’s student-run restaurant.

Susan is the steady, practical guide at Mary Sue & Susan, bringing clarity, structure, and a warm sense of encouragement to every recipe she touches. Susan joined the site with a simple goal: help people cook with more confidence and less guesswork.

Leave a Reply

Your email address will not be published. Required fields are marked *

Recipe rating 5 Stars 4 Stars 3 Stars 2 Stars 1 Star