
Garlic Chicken Tenders Recipe For Crunchy Golden Perfection
Crispy garlic chicken tenders promise a mouthwatering adventure for anyone craving seriously delicious comfort food.
Prepare to experience pure satisfaction with this crowd-pleasing favorite that transforms simple ingredients into something extraordinary.
Savory and crunchy, these tenders deliver maximum flavor without complicated cooking techniques.
Home cooks of all skill levels can confidently tackle this straightforward recipe that guarantees impressive results.
Perfectly seasoned and golden brown, these chicken tenders will become an instant family classic that disappears from plates faster than you can serve them.
Guaranteed to satisfy hunger and spark joy around the dinner table, this recipe strikes the perfect balance between simplicity and deliciousness.
Cooking enthusiasts and weeknight meal planners will absolutely love how quickly these crispy garlic chicken tenders come together.
Dinner is about to get seriously delicious—jump into this recipe and enjoy every single bite.
Why Crispy Garlic Chicken Tenders Always Win
Core Ingredients for Crispy Garlic Chicken Tenders
Chicken Base:Primary Breading:Binding and Coating:Glaze Ingredients:Prep Tools For Crispy Garlic Chicken Tenders
Cooking Method for Crispy Garlic Chicken Tenders
Prep the Flavor Layers
Set out three shallow bowls for your breading station. Mix your dry coating carefully, combining these ingredients:
Whisk 2 eggs in a separate bowl and pour panko breadcrumbs into the third bowl.
Create the Crispy Coating
Take each chicken tender and roll it through your seasoned flour mix, making sure every inch gets covered. Next, dunk the tender into the whisked eggs, allowing excess to drip off. Finally, press the tender into panko breadcrumbs, ensuring a complete, crunchy exterior.
Air Fry to Golden Perfection
Heat your air fryer to exactly 375°F. Spray the basket lightly with cooking spray. Arrange 1 lb of chicken tenders in a single layer without crowding. Cook for 11 minutes, flipping halfway through to ensure even browning.
Craft the Garlic Glaze
Melt 3 tablespoons butter in a small saucepan over medium heat. Drop in:
Saute for exactly 1 minute. Then add:
Let the sauce simmer for 2 minutes, stirring occasionally.
Final Flavor Finish
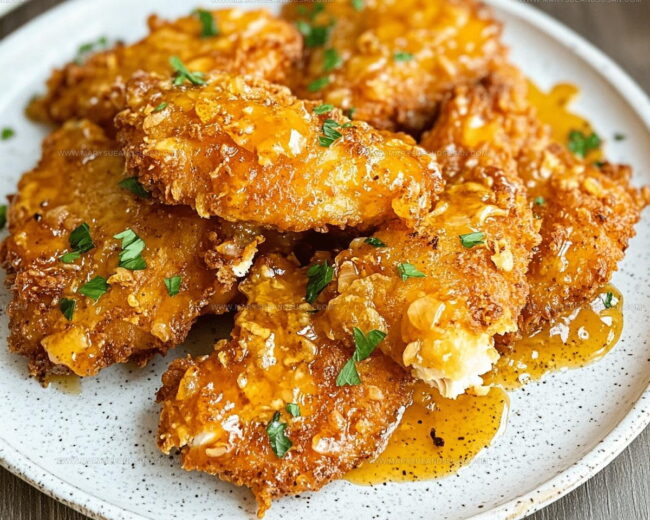
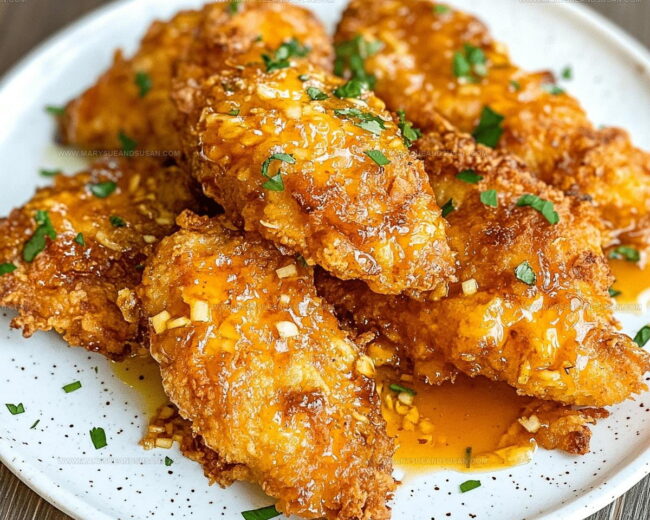
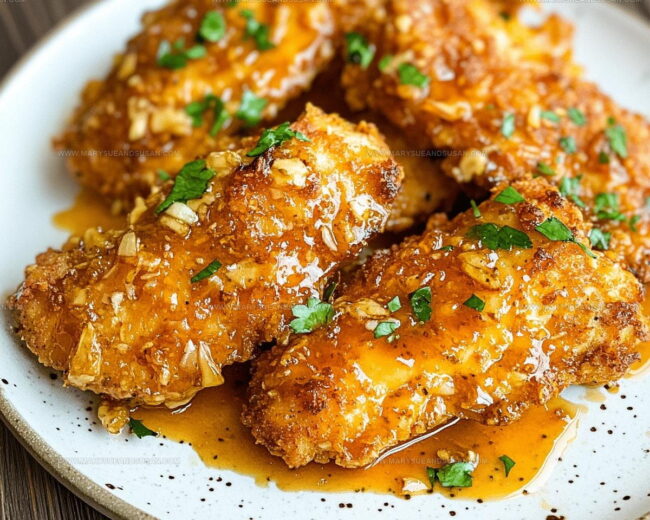
Pull your crispy chicken tenders from the air fryer. Drizzle the warm garlic honey glaze directly over the tenders or gently toss them in the sauce. Serve immediately while they’re hot and crunchy.
Notes For Best Results With Crispy Garlic Chicken Tenders
Creative Variations For Crispy Garlic Chicken Tenders
Best Serving Options For Crispy Garlic Chicken Tenders
Best Storage Practices For Crispy Garlic Chicken Tenders
Answers To Common Questions About Crispy Garlic Chicken Tenders
Why use panko breadcrumbs instead of regular breadcrumbs?
Panko creates an extra crispy, light coating that gives your chicken tenders a crunchier texture compared to traditional breadcrumbs. They absorb less oil and stay crisp longer.
Can I make these chicken tenders ahead of time?
You can prepare the breaded tenders and refrigerate them for up to 2 hours before cooking. This helps the breading stick better and ensures a crispier result.
How do I know the chicken is fully cooked?
Use a meat thermometer to check that the internal temperature reaches 165°F. The chicken should look golden brown and feel firm when touched.
What if I don’t have an air fryer?
You can bake these tenders in a preheated oven at 425°F for 15-18 minutes, turning them halfway through cooking. They’ll be slightly less crispy but still delicious.
Can I make this recipe gluten-free?
Substitute the flour and panko with gluten-free alternatives like almond flour and gluten-free breadcrumbs. The rest of the recipe remains the same.

Crispy Garlic Chicken Tenders Recipe
- Total Time: 22 minutes
- Yield: 4 1x
Description
Garlic chicken tenders bring serious flavor to your dinner table with zero fuss. Crunchy golden coating and zesty garlic kick make this quick meal a total weeknight winner.
Ingredients
Proteins:
- 1 lb chicken tenders
Dry Coating:
- 1 cup all-purpose flour
- 1 cup panko breadcrumbs
- 1 teaspoon garlic powder
- 1 teaspoon paprika
- ½ teaspoon salt
- ½ teaspoon black pepper
Liquid and Seasoning:
- 2 eggs
- 3 tablespoons butter
- 4 cloves garlic
- ¼ cup honey
- 2 tablespoons soy sauce
- 1 teaspoon lemon juice
Instructions
- Create three separate shallow dishes: mix 1 cup flour with 1 teaspoon garlic powder, 1 teaspoon paprika, ½ teaspoon salt, and ½ teaspoon pepper in the first dish. Whisk 2 eggs in the second dish. Pour 1 cup panko breadcrumbs into the third dish.
- Take each chicken tender and thoroughly coat it in the seasoned flour mixture, ensuring complete coverage. Dunk the floured tender into the whisked eggs, allowing excess to drip off.
- Roll the egg-coated tender in panko breadcrumbs, pressing firmly to help crumbs adhere completely to your chicken. Repeat for all tenders, creating an even, crispy exterior.
- Prepare your air fryer by preheating to 375F. Lightly spray the basket with cooking oil to prevent sticking. Arrange chicken tenders in a single layer without overcrowding.
- Cook tenders for 10-12 minutes at 375F, flipping halfway through cooking time. Ensure chicken reaches an internal temperature of 165F for safe consumption.
- While chicken cooks, melt 3 tablespoons butter in a small saucepan over medium heat. Add 4 minced garlic cloves and saute for exactly 1 minute.
- Pour ¼ cup honey, 2 tablespoons soy sauce, and 1 teaspoon lemon juice into the butter mixture. Simmer for 2 minutes, stirring constantly to blend flavors.
- Remove tenders from air fryer when golden and crispy. Drizzle generously with warm honey garlic butter sauce or toss to coat completely.
- Transfer sauced tenders to serving plate immediately. Serve hot for maximum crispiness and flavor.
Notes
- Check your chicken tenders are similar in size to ensure even cooking and crispy results.
- Add extra garlic powder to the flour mixture if wanting more intense garlic flavor throughout the coating.
- Pat chicken tenders completely dry before breading to help panko crumbs stick better and create a crunchier exterior.
- For gluten-free version, replace wheat flour with cornstarch or gluten-free flour blend and use gluten-free panko breadcrumbs.
- Prep Time: 10 minutes
- Cook Time: 12 minutes
- Category: Chicken
- Method: Air Frying
- Cuisine: American
Nutrition
- Serving Size: 4
- Calories: 466 kcal
- Sugar: 9 g
- Sodium: 460 mg
- Fat: 19 g
- Saturated Fat: 7 g
- Unsaturated Fat: 10 g
- Trans Fat: 0.2 g
- Carbohydrates: 38 g
- Fiber: 2 g
- Protein: 33 g
- Cholesterol: 135 mg
Mary Sue
Founder & Creative Recipe Developer
Expertise
Comfort Food Twists, Seasonal Cooking, Creative Flavor Pairings, Easy Weeknight Dinners, Flexible Pantry Cooking
Education
Mary Sue is the playful, creative recipe mind behind Mary Sue & Susan, known for big flavor ideas, warm storytelling, and dishes that feel both comforting and a little unexpected. She has a talent for taking familiar meals and giving them just enough personality to make them memorable.