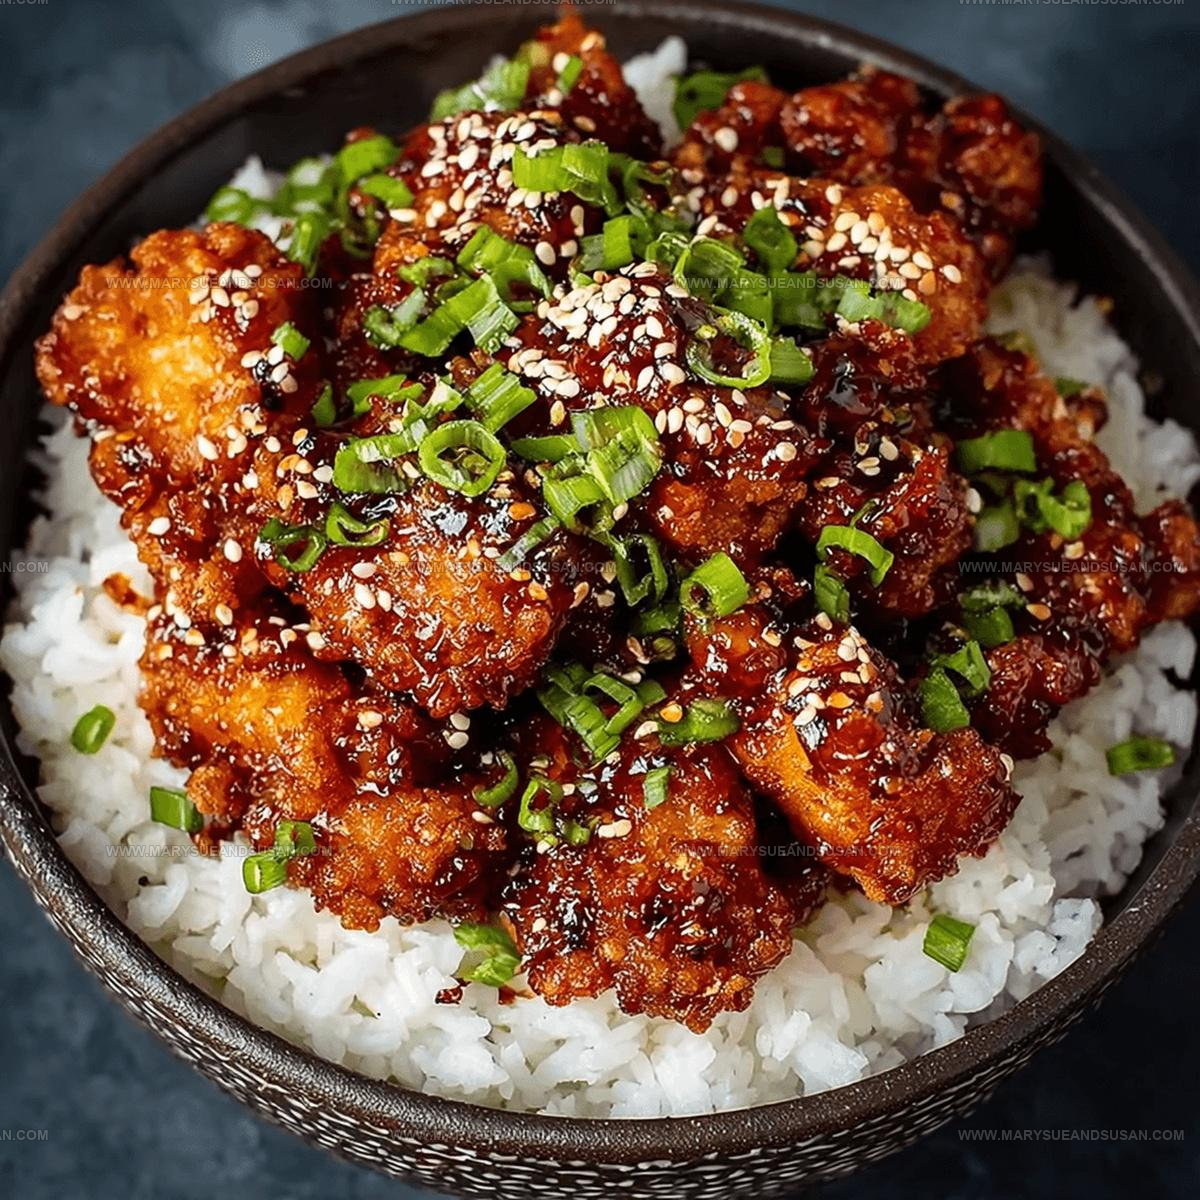
Sesame Chicken Recipe With Golden Crunch and Sticky Glaze
Sesame chicken promises a delightful explosion of flavor that satisfies serious comfort food cravings.
Restaurant-inspired dishes often seem complicated, but this crowd-pleasing recipe breaks all those misconceptions.
Crispy, golden-brown chicken pieces coated in an addictive sauce guarantee instant mealtime excitement.
Weeknight dinners demand something special, and this recipe delivers pure deliciousness without complicated techniques.
Home cooks can easily master these restaurant-style flavors with simple ingredients and straightforward preparation.
Complex flavor profiles don't require professional chef skills – just passion and basic kitchen confidence.
Standout Features Of Crispy Sesame Chicken with Sweet Sticky Sauce
Core Ingredients For Crispy Sesame Chicken
Main Ingredients:Sauce Components:Sauce Thickener and Garnish:Handy Kitchen Tools for Crispy Sesame Chicken With Sweet Sticky Sauce
Steps for Making Crispy Sesame Chicken With Sticky Sauce
Prep the Chicken
Take your chicken breast and chop it into bite-sized chunks. Sprinkle salt and pepper all over, making sure each piece gets some seasoning love.
Create Coating Stations
Grab two bowls for your crispy chicken adventure. In one bowl, crack and whisk those 2 large eggs until smooth. In the second bowl, mix together:
Coat Those Chicken Pieces
Dip each chicken chunk first into the egg bath, then roll it around in the flour-cornstarch mix. Tap off any extra coating so you get a light, even layer.
Get the Oil Ready
Heat vegetable oil in a large skillet to exactly 375°F. This temperature is key for getting that perfect golden crunch.
Fry to Crispy Perfection
Drop chicken pieces into the hot oil in small batches. Fry each side for 3-4 minutes until they turn a beautiful golden brown. Check that the internal temp hits 165°F for safe eating.
Drain and Rest
Pull the chicken out and let it rest on paper towels. This helps keep those pieces super crisp.
Make the Magic Sauce
In a saucepan, combine:
Thicken the Sauce
Mix together in a small bowl:
Stir this into the sauce and simmer for 2-3 minutes until it gets nice and glossy.
Sauce the Chicken
Gently toss those crispy chicken pieces in the warm sauce, making sure every chunk gets a delicious coating.
Final Touch
Slide the saucy chicken onto a serving plate. Sprinkle generously with sesame seeds and chopped green onions. Serve right away while everything is hot and crispy.
Cooking Know-How For Crispy Sesame Chicken
Flavor Twists for Crispy Sesame Chicken With Sweet Sticky Sauce
Best Ways To Serve Sesame Chicken With Sticky Sauce
How Long Does Sesame Chicken With Sticky Sauce Keep
Common Questions for Crispy Sesame Chicken
What makes the coating so crispy?
The combination of eggs, flour, and cornstarch creates a light, crunchy exterior that seals in the chicken’s moisture and provides that perfect crisp when fried.
Can I use a different type of vinegar?
Rice vinegar works best for authentic flavor, but apple cider vinegar can work as a substitute if rice vinegar isn’t available in your pantry.
How do I know the oil is hot enough for frying?
Use a cooking thermometer to check that the oil reaches 375°F. If you don’t have one, drop a small piece of bread into the oil – it should sizzle and brown quickly.
Are sesame seeds necessary for the recipe?
Sesame seeds add texture and nutty flavor, but they’re optional. If you don’t have them, the dish will still taste delicious.
Can I make this recipe gluten-free?
Replace all-purpose flour with gluten-free flour and use tamari instead of soy sauce to create a gluten-free version of the dish.
What’s the best way to keep the chicken crispy?
Serve immediately after coating with sauce, and avoid letting the chicken sit too long to maintain its crunchiness.
Crispy Sesame Chicken With Sweet Sticky Sauce Recipe
- Total Time: 25 minutes
- Yield: 4 1x
Description
Sesame Chicken delivers a restaurant-style favorite straight from your kitchen, perfectly balancing crispy chicken with a delightfully sticky sauce that’ll have everyone asking for seconds. Crunchy golden bites glazed in sweet sesame goodness make this dish a weeknight dinner champion that comes together faster than takeout.
Ingredients
Main Ingredients:
- 1 pound chicken breast
- ½ cup all-purpose flour
- ½ cup cornstarch
- 2 large eggs
Liquid/Seasoning Ingredients:
- ½ cup honey
- ¼ cup soy sauce
- 2 tablespoons rice vinegar
- 1 tablespoon sesame oil
- Vegetable oil
Aromatics and Garnishes:
- 2 cloves garlic
- 1 teaspoon salt
- ½ teaspoon black pepper
- 1 tablespoon cornstarch
- 2 tablespoons water
- Sesame seeds
- Chopped green onions
Instructions
- Cut 1 pound of boneless, skinless chicken breast into bite-sized pieces. Sprinkle 1 teaspoon salt and ½ teaspoon black pepper over the chicken, ensuring even seasoning.
- Create a crispy coating by preparing two separate bowls: one with 2 beaten large eggs, another with ½ cup all-purpose flour and ½ cup cornstarch mixed together.
- Dunk each chicken piece into the egg mixture, then thoroughly coat in the flour-cornstarch blend. Shake off excess coating to ensure a light, even layer.
- Heat vegetable oil in a large skillet to 375°F. Carefully place coated chicken pieces into the hot oil, working in batches to maintain proper temperature.
- Fry chicken for 3-4 minutes per side until golden brown and internal temperature reaches 165°F. Remove pieces and drain on paper towels to preserve crispiness.
- In a saucepan, whisk together ½ cup honey, ¼ cup soy sauce, 2 tablespoons rice vinegar, 2 minced garlic cloves, and 1 tablespoon sesame oil.
- Create a thickening slurry by mixing 1 tablespoon cornstarch with 2 tablespoons water. Stir this into the sauce and simmer for 2-3 minutes until it reaches a glossy, sticky consistency.
- Gently toss the crispy chicken pieces in the warm sauce, ensuring each piece gets an even coating.
- Transfer to a serving plate and generously sprinkle with sesame seeds and chopped green onions. Serve immediately while chicken remains crisp and sauce is warm.
Notes
- Toast sesame seeds before sprinkling for an extra nutty flavor that enhances the overall dish.
- Use a deep-fry thermometer to maintain oil temperature around 350°F, ensuring crispy chicken without absorbing excess oil.
- Let chicken pieces rest on a wire rack after frying to keep the coating crisp and prevent soggy bottoms.
- For a gluten-free version, swap wheat flour with rice flour or a gluten-free all-purpose blend and use tamari instead of soy sauce.
- Prep Time: 10 minutes
- Cook Time: 15 minutes
- Category: Chicken
- Method: Frying
- Cuisine: Chinese
Nutrition
- Serving Size: 4
- Calories: 390 kcal
- Sugar: 22 g
- Sodium: 800 mg
- Fat: 9 g
- Saturated Fat: 1.5 g
- Unsaturated Fat: 6.5 g
- Trans Fat: 0 g
- Carbohydrates: 40 g
- Fiber: 1 g
- Protein: 30 g
- Cholesterol: 110 mg
Susan Whitaker
Content Specialist & Home Cooking Guide
Expertise
Family-friendly Meals, Simple Healthy Cooking, Ingredient Substitutions, Beginner-friendly Recipes, Flexible Meal Prep
Education
Susan is the steady, practical guide at Mary Sue & Susan, bringing clarity, structure, and a warm sense of encouragement to every recipe she touches. Susan joined the site with a simple goal: help people cook with more confidence and less guesswork.