
Crunchy Shrimp Balls Recipe You Need to Try
Crispy shrimp balls have become a beloved appetizer at parties and family gatherings across many cultures, loved for the satisfying crunch that gives way to tender, flavorful bites.
There's something wonderfully fun about finger foods that feel special yet remain approachable enough for casual meals.
What makes them so popular is how they fit any occasion, from game day spreads to elegant dinner parties where guests mingle with plates in hand.
The golden exterior alone catches attention, while the savory interior keeps everyone coming back for more.
If you love seafood with a delightful textural contrast, this recipe delivers exactly that without complicated techniques or hard-to-find items.
They're also freezer-friendly, which means you can prepare them ahead when life gets busy.
Time to roll up your sleeves and make a batch that will have everyone asking for seconds.
Why You’ll Love Crispy Shrimp Balls
Core Ingredients for Shrimp Balls
Main Protein:Binding Ingredients:Flavor Enhancers:Cooking Medium:Essential Tools for Crispy Shrimp Balls
Crispy Shrimp Balls Cooking Guide
Prepare Shrimp Mixture
Grab your cutting board and roughly chop the 1 lb raw shrimp into small pieces. If a food processor works better for you, pulse the shrimp carefully – just don’t turn them into a total paste. In a large mixing bowl, combine all the ingredients:
Stir everything together until it feels like it will hold its shape. If the mixture seems too wet, sprinkle in 1 tbsp cornstarch to help bind everything.
Shape Shrimp Balls
Wet your hands slightly with cold water to keep the mixture from sticking. Roll the mixture into small balls about 1-1.5 inches in diameter. This batch should make around 20-25 crispy little bites.
Heat the Cooking Oil
Pour vegetable oil into a large skillet, about 1/2 inch deep. Heat the oil to 350°F over medium-high heat. A cooking thermometer helps ensure the right temperature.
Fry the Shrimp Balls
Carefully place the shrimp balls into the hot oil. Fry them in batches so they don’t crowd the pan. Cook for 3-4 minutes, turning occasionally to get a beautiful golden brown color on all sides.
Drain and Cool
Use a slotted spoon to transfer the shrimp balls onto a paper towel-lined plate. This helps soak up any extra oil and keeps them crispy.
Serve and Garnish
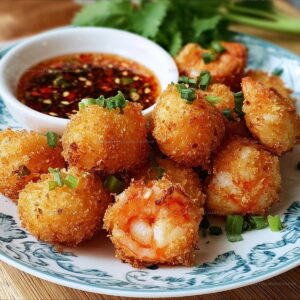
Sprinkle some chopped fresh cilantro on top if you want extra flavor. Serve these hot with sweet chili sauce or soy sauce for dipping. Perfect as an appetizer or snack that everyone will enjoy!
How to Enhance Crispy Shrimp Balls with Pro Tips
Crispy Shrimp Balls with Flavorful Coating Options
How to Serve Crispy Shrimp Balls
Crispy Shrimp Balls Storage Notes
Crispy Shrimp Balls Questions Answered
Can I use frozen shrimp for this recipe?
Frozen shrimp works perfectly fine. Just make sure to thaw them completely and pat dry before chopping to prevent excess moisture in the mixture.
What if my shrimp balls fall apart while frying?
Ensure your mixture is well-combined and chilled before shaping. Adding a bit more cornstarch can help bind the ingredients together and prevent crumbling.
How do I know when the shrimp balls are fully cooked?
The exterior should be golden brown, and the internal temperature should reach 145°F. Cut one open to check the center is opaque and firm.
Can I bake these instead of frying?
While frying gives the best crispy texture, you can bake them at 400°F for 15-20 minutes, turning halfway through. The result won’t be quite as crisp.
Are these shrimp balls gluten-free?
Not as written. Swap breadcrumbs for gluten-free panko or crushed gluten-free crackers to make the recipe celiac-friendly.
How far ahead can I prepare the shrimp mixture?
You can refrigerate the prepared mixture for up to 24 hours before cooking. Cover tightly and keep chilled until ready to shape and fry.
Crispy Shrimp Balls Recipe
- Total Time: 23-25 minutes
- Yield: 4 1x
Description
Crispy Shrimp Balls are your golden, crunchy ticket to seafood snack perfection that’ll make your taste buds dance with pure delight. Packed with tender shrimp, these bite-sized treats bring restaurant-quality appetizer magic straight to your kitchen counter.
Ingredients
Main Ingredients:
- 1 lb raw shrimp
- ½ cup panko breadcrumbs
- 1 egg
Supporting Ingredients:
- ¼ cup green onions
- 2 cloves garlic
- 1 tablespoon fresh ginger
- 1 tablespoon soy sauce
- 1 tablespoon cornstarch
Seasonings:
- 1 teaspoon sesame oil
- ½ teaspoon salt
- ½ teaspoon black pepper
- ¼ cup cilantro
- Vegetable oil
Instructions
- Pulse 1 lb raw shrimp in a food processor until coarsely chopped, ensuring you do not create a paste-like consistency.
- Transfer chopped shrimp to a large mixing bowl, adding ½ cup panko breadcrumbs, 1 beaten egg, ¼ cup finely chopped green onions, 2 minced garlic cloves, 1 tbsp grated ginger, 1 tbsp soy sauce, 1 tsp sesame oil, ½ tsp salt, and ½ tsp black pepper.
- Blend ingredients gently with your hands, incorporating 1 tbsp cornstarch if the mixture seems too wet to hold shape.
- Dampen your palms with cold water to prevent sticking, then carefully form the mixture into uniform balls measuring 1-1.5 inches in diameter.
- Pour 2 inches of vegetable oil into a heavy skillet, heating to 350°F over medium-high heat.
- Carefully lower 6-8 shrimp balls into the hot oil, maintaining a consistent temperature.
- Fry each batch for 3-4 minutes, rotating periodically to achieve an even golden-brown exterior.
- Remove shrimp balls using a slotted spoon, placing them on a paper towel-lined plate to drain excess oil.
- Sprinkle chopped cilantro on top and serve immediately with sweet chili sauce for dipping.
Notes
- Chop shrimp carefully to maintain a chunky texture that helps the balls hold together and provides a satisfying bite.
- Keep your hands slightly damp when forming balls to prevent the mixture from sticking and help create smooth, uniform shapes.
- Maintain consistent oil temperature around 350°F for even browning and crispy exterior without burning the delicate shrimp mixture.
- These shrimp balls work great for gluten-free diets by substituting breadcrumbs with almond flour or gluten-free panko.
- Prep Time: 15 minutes
- Cook Time: 8-10 minutes
- Category: Shrimp
- Method: Frying
- Cuisine: Chinese
Nutrition
- Serving Size: 4
- Calories: 180 kcal
- Sugar: 1 g
- Sodium: 550 mg
- Fat: 7 g
- Saturated Fat: 1 g
- Unsaturated Fat: 5 g
- Trans Fat: 0 g
- Carbohydrates: 14 g
- Fiber: 1 g
- Protein: 18 g
- Cholesterol: 115 mg
Mary Sue
Founder & Creative Recipe Developer
Expertise
Comfort Food Twists, Seasonal Cooking, Creative Flavor Pairings, Easy Weeknight Dinners, Flexible Pantry Cooking
Education
Mary Sue is the playful, creative recipe mind behind Mary Sue & Susan, known for big flavor ideas, warm storytelling, and dishes that feel both comforting and a little unexpected. She has a talent for taking familiar meals and giving them just enough personality to make them memorable.