
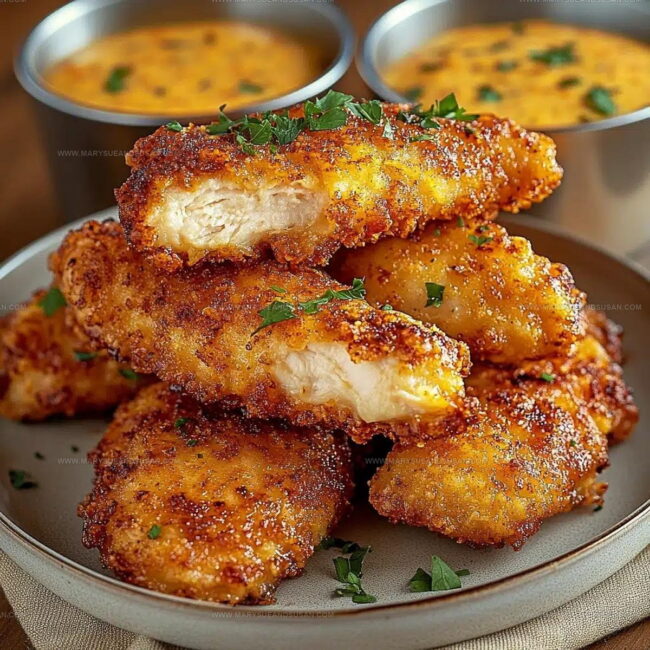
Crack Chicken Tenders Recipe for Addictive Comfort Food
Crack chicken tenders burst with flavor that instantly captures everyone's attention.
Ridiculously addictive and seriously delicious, these tender bites have become a social media sensation for good reason.
Home cooks and food enthusiasts cannot resist the magnetic pull of this crowd-pleasing dish.
Savory, crispy, and packed with bold taste sensations, crack chicken tenders promise a mouthwatering experience that goes beyond ordinary meal preparations.
Simple ingredients combine in a way that creates pure magic on your dinner plate.
Restaurant-quality results are surprisingly achievable with minimal cooking skills and just a few basic components.
Why Crack Chicken Tenders Are Always A Hit
Ingredients For Crack Chicken Tenders
Chicken Base:Marinade:Breading Mixture:Seasoning Blend:Cheese Topping:Frying:Essential Kitchen Tools for Crack Chicken Tenders
Simple Way to Make Crack Chicken Tenders
Marinate the Chicken
Grab those 2 lbs of chicken tenders and pour 2 cups of buttermilk over them in a big bowl. Pop the bowl in the refrigerator and let them chill for 2-3 hours, soaking up all that tangy goodness.
Prepare Breading Station
Set up your breading station with three separate dishes. In the first dish, whisk together:
In a second dish, crack and whisk 2 large eggs.
Bread the Chicken
Pull those marinated tenders out of the buttermilk, letting excess drip off. Dunk each tender first into the egg mixture, then roll completely in the seasoned breadcrumb mixture. Make sure every inch gets a nice, thick coating.
Heat the Oil
Pour 4 cups of vegetable oil into a large, deep skillet. Heat it to exactly 375°F – this temperature is crucial for that perfect crispy outside.
Fry the Tenders
Carefully slide the breaded tenders into the hot oil. Fry for 3-4 minutes on each side until they turn a beautiful golden brown. Don’t crowd the pan – work in batches if needed.
Add the Cheese
Transfer the crispy tenders to a baking sheet. Sprinkle 1 cup of shredded cheddar cheese evenly over the top.
Broil and Finish
Set your oven to broil. Slide the sheet under the broiler for 1-2 minutes until the cheese melts and gets slightly bubbly. Watch carefully to prevent burning!
Season and Serve
Dust the hot tenders with 1/4 cup of ranch seasoning mix. Let them rest for 2-3 minutes – this helps keep that crispy coating perfect. Serve immediately and watch them disappear!
Tried-And-True Notes for Crack Chicken Tenders
Alternate Takes On Crack Chicken Tenders
Best Serving Options For Crack Chicken Tenders
Best Way To Store Crack Chicken Tenders
Crack Chicken Tenders Common Questions
How do I know when the chicken tenders are fully cooked?
Check the internal temperature reaches 165°F using a meat thermometer. The exterior should be golden brown and crispy.
Can I use a different type of cheese?
Absolutely! Monterey Jack, pepper jack, or mozzarella work great. Select a cheese that melts well and complements the crispy chicken.
What if I don’t have buttermilk?
Create a quick substitute by mixing milk with a tablespoon of vinegar or lemon juice. Let it sit for 5 minutes before using.
Is it necessary to use ranch seasoning?
Not required, but the ranch adds fantastic flavor. Salt and pepper work as a simple alternative if you prefer.
Can these chicken tenders be baked instead of fried?
Bake at 425°F for about 15-20 minutes, flipping halfway. The texture will be slightly less crispy than deep-frying.
How do I prevent the breading from falling off during cooking?
Ensure chicken is patted dry before marinating, and let excess egg drip off before coating with breadcrumbs.
Deep-Fried Cheddar Ranch Crack Chicken Tenders Recipe
- Total Time: 3 hours 26 minutes
- Yield: 6 1x
Description
Crack chicken tenders deliver serious comfort straight from your kitchen, loaded with cheesy goodness that makes dinner seriously delicious. Crispy coating and melted cheese create a crowd-pleasing meal your family will devour in minutes.
Ingredients
Main Proteins:
- 2 lbs chicken tenders
- 2 large eggs
Coating and Breading:
- 1 cup all-purpose flour
- 1 cup panko breadcrumbs
- ½ cup grated parmesan cheese
- 1 cup shredded cheddar cheese
Seasonings and Liquids:
- 2 cups buttermilk
- 2 teaspoons salt
- 1 teaspoon black pepper
- 1 teaspoon garlic powder
- 1 teaspoon onion powder
- ½ teaspoon paprika
- ¼ cup ranch seasoning mix
- 4 cups vegetable oil
Instructions
- Drench chicken tenders in 2 cups buttermilk, ensuring complete coverage. Seal container and refrigerate for precisely 2.5 hours to absorb maximum flavor.
- Combine 1 cup flour, 1 cup panko, ½ cup parmesan, 2 tsp salt, 1 tsp black pepper, 1 tsp garlic powder, 1 tsp onion powder, and ½ tsp paprika in a wide shallow dish.
- Crack 2 large eggs into separate bowl and whisk thoroughly until smooth and uniform.
- Drain chicken from buttermilk, allowing excess liquid to drip completely off each tender.
- Dip each tender first into whisked eggs, then immediately roll through seasoned breadcrumb mixture for complete, even coating.
- Pour 4 cups vegetable oil into large deep skillet. Heat oil precisely to 375°F using a kitchen thermometer.
- Gently lower breaded tenders into hot oil. Fry 3-4 minutes per side until exterior turns deep golden brown and crispy.
- Transfer fried tenders onto paper towel-lined plate to absorb excess oil.
- Arrange tenders on baking sheet and sprinkle 1 cup shredded cheddar cheese across surface.
- Broil for 1-2 minutes until cheese melts and develops slight bubbling.
- Dust hot tenders with ¼ cup ranch seasoning mix just before serving.
- Allow tenders to rest 2-3 minutes to maintain maximum crispiness before plating.
Notes
- Marinate chicken in buttermilk for extra tenderness and to help the breading stick better.
- Use a deep-fry thermometer to ensure oil is exactly 375°F for perfectly crispy exterior without burning.
- For gluten-free version, replace wheat flour and panko with almond flour or gluten-free breadcrumbs.
- Drain tenders on a wire rack instead of paper towels to keep breading crisp and prevent soggy bottoms.
- Prep Time: 27 minutes
- Cook Time: 26 minutes
- Category: Chicken
- Method: Frying
- Cuisine: American
Nutrition
- Serving Size: 6
- Calories: 605 kcal
- Sugar: 1 g
- Sodium: 1120 mg
- Fat: 38 g
- Saturated Fat: 11 g
- Unsaturated Fat: 23 g
- Trans Fat: 0.5 g
- Carbohydrates: 19 g
- Fiber: 1.5 g
- Protein: 46 g
- Cholesterol: 190 mg
Susan Whitaker
Content Specialist & Home Cooking Guide
Expertise
Family-friendly Meals, Simple Healthy Cooking, Ingredient Substitutions, Beginner-friendly Recipes, Flexible Meal Prep
Education
Susan is the steady, practical guide at Mary Sue & Susan, bringing clarity, structure, and a warm sense of encouragement to every recipe she touches. Susan joined the site with a simple goal: help people cook with more confidence and less guesswork.