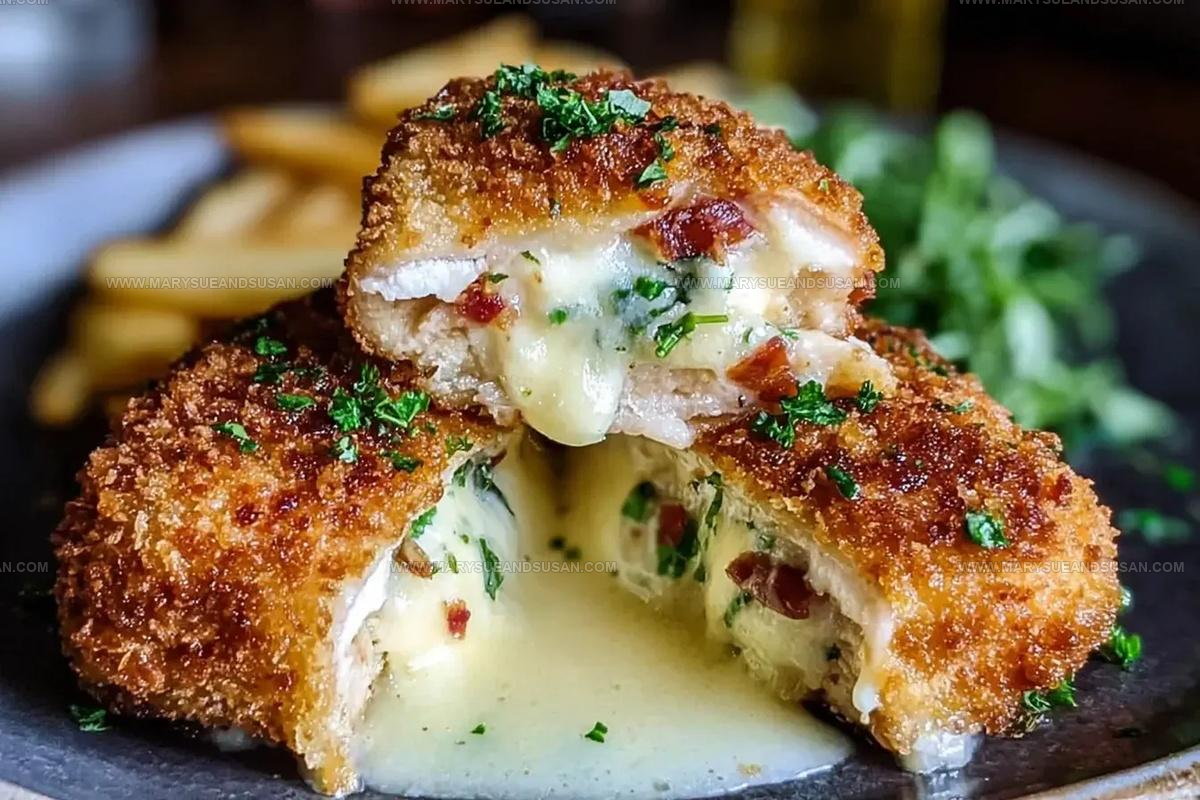
Crispy Chicken Kiev Recipe For Golden Breaded Perfection
Succulent chicken kiev represents a classic comfort dish that sparks joy around dinner tables worldwide.
Crispy golden exteriors promise a delightful surprise waiting inside with each perfectly crafted bite.
Russian-inspired cuisine continues to charm home cooks seeking memorable meal experiences that feel luxurious yet approachable.
Seasoned and novice chefs alike appreciate how this recipe transforms simple ingredients into something extraordinary.
Tender chicken wrapped in buttery goodness creates a satisfying meal that feels like a warm culinary hug.
Impressive enough for special occasions but simple enough for weeknight dinners, chicken kiev stands as a reliable crowd-pleaser.
What Makes Easy Chicken Kiev Worth Making
Ingredients You’ll Need For Easy Chicken Kiev
Garlic Herb Butter:Chicken Preparation:Coating Ingredients:Handy Kitchen Tools for Easy Chicken Kiev
How to Make Easy Chicken Kiev

Whip Up Herbed Butter
Create a flavor-packed butter mixture by blending softened ingredients:
Mix everything until smooth, then roll into a log using plastic wrap. Stick this in the freezer for 30 minutes to firm up.
Prep the Chicken Breasts
Grab your chicken and flatten each breast to about 1/4-inch thickness. Sprinkle both sides with 1 tsp salt and 1/4 tsp black pepper. This helps build layers of flavor before the main event.
Create Butter Pockets
Take out your chilled butter log and slice it into 4 equal pieces. Carefully tuck one butter piece into the center of each chicken breast. Fold the sides over like you’re wrapping a tight package, sealing in all that garlicky goodness. Pop these into the refrigerator for 30 minutes to help them hold their shape.
Set Up Breading Station
Prepare three shallow dishes for coating:
Roll each chicken roll first in flour, then dip in egg, and finally coat completely with breadcrumbs. Press the crumbs gently to make sure they stick.
Crisp the Exterior
Heat 1/2 inch of avocado oil in a skillet over medium heat. Carefully place the breaded chicken rolls in the hot oil. Fry for 3-4 minutes on each side until they turn a beautiful golden brown.
Finish in the Oven
Transfer the partially fried chicken to a baking dish. Slide into a preheated oven at 350°F. Bake for 20-25 minutes, checking that the internal temperature reaches 165°F. This ensures the chicken is cooked through while keeping the inside super juicy.
Cook Smarter With Easy Chicken Kiev
What New Spins Enhance Easy Chicken Kiev
Serving Styles For Chicken Kiev
How To Store Chicken Kiev
Easy Chicken Kiev FAQs Explained
Can I make the garlic herb butter ahead of time?
Absolutely! You can prepare the butter log up to a week in advance and store it wrapped tightly in the freezer. When you’re ready to make the Chicken Kiev, just slice and use directly from the freezer.
What if my chicken breasts are really thick?
No problem. Carefully butterfly the chicken breasts and then pound them to an even 1/4-inch thickness. This ensures your chicken cooks evenly and helps create the perfect rolled shape.
How do I prevent the butter from leaking during cooking?
The key is chilling the rolled chicken before breading. After you wrap the butter inside the chicken, refrigerate for 30 minutes so the butter firms up. This helps seal the edges and prevents melting too quickly.
Can I use panko instead of regular breadcrumbs?
Panko works great! They create an extra crispy exterior that adds wonderful texture to your Chicken Kiev. Just press the panko crumbs firmly onto the chicken to help them stick.
What kind of oil works best for frying?
Vegetable or canola oil are perfect for this recipe. They have high smoke points and neutral flavors that won’t overpower the delicate chicken and herb butter.

Easy Chicken Kiev Recipe
- Total Time: 1 hours 40-44 minutes
- Yield: 4 1x
Description
Chicken Kiev brings classic comfort straight to your dinner table with crispy golden breading and a luscious garlic butter center that melts perfectly when sliced. Comfort cooking doesn’t get easier than this Russian-inspired dish that guarantees a delightful meal your family will devour.
Ingredients
Main Ingredients:
- 4 chicken breasts
- 8 tablespoons unsalted butter
- 2 large eggs
- 1 cup plain breadcrumbs
- ½ cup all-purpose flour
Supporting Seasonings:
- 2 garlic cloves
- 1 ½ tablespoons fresh parsley
Supporting Finishing Items:
- 1 teaspoon lemon juice
- 1 teaspoon salt
- ½ teaspoon black pepper
- Avocado oil or any neutral oil
Instructions
- Blend 8 tablespoons softened butter with 2 minced garlic cloves, 1 ½ tablespoons chopped parsley, 1 teaspoon lemon juice, ¼ teaspoon salt, and ⅛ teaspoon pepper until completely smooth.
- Wrap the butter mixture in plastic and shape into a tight log. Place in freezer for 30 minutes until completely firm.
- Pound 4 chicken breasts to ¼-inch thickness using a meat mallet. Sprinkle each side with ¼ teaspoon salt and a pinch of pepper.
- Cut the frozen butter log into 4 equal pieces. Position one butter piece in the center of each chicken breast.
- Fold the chicken sides over the butter, creating a tight roll. Secure edges to prevent butter from leaking during cooking.
- Refrigerate the rolled chicken for 30 minutes to help maintain shape.
- Set up three shallow dishes: one with ½ cup flour, another with 2 beaten eggs, and the third with 1 cup breadcrumbs.
- Roll each chicken roll first in flour, then dip in egg, and finally coat completely with breadcrumbs. Press crumbs firmly to adhere.
- Pour ½ inch of avocado oil into a large skillet. Heat to medium temperature around 350°F.
- Carefully place breaded chicken rolls into hot oil. Fry for 3-4 minutes per side until golden brown and crispy.
- Transfer fried chicken to a baking dish. Bake at 350°F for 20-25 minutes until internal temperature reaches 165°F.
Notes
- Freeze the garlic herb butter log completely before slicing to ensure it stays intact when stuffing the chicken breasts.
- Use plastic wrap when rolling chicken to create a tight seal and prevent butter from leaking during cooking.
- Pat chicken breasts completely dry before seasoning to help breading stick better and create a crispier exterior.
- For a gluten-free version, swap regular breadcrumbs with almond flour or crushed gluten-free crackers for the same crispy texture.
- Prep Time: 1 hour 15 minutes
- Cook Time: 25-29 minutes
- Category: Chicken
- Method: Frying
- Cuisine: Ukrainian
Nutrition
- Serving Size: 4
- Calories: 545 kcal
- Sugar: 0.5 g
- Sodium: 560 mg
- Fat: 35 g
- Saturated Fat: 14 g
- Unsaturated Fat: 19 g
- Trans Fat: 0.2 g
- Carbohydrates: 22 g
- Fiber: 1.5 g
- Protein: 44 g
- Cholesterol: 150 mg
Susan Whitaker
Content Specialist & Home Cooking Guide
Expertise
Family-friendly Meals, Simple Healthy Cooking, Ingredient Substitutions, Beginner-friendly Recipes, Flexible Meal Prep
Education
Susan is the steady, practical guide at Mary Sue & Susan, bringing clarity, structure, and a warm sense of encouragement to every recipe she touches. Susan joined the site with a simple goal: help people cook with more confidence and less guesswork.