Garlic Butter Parmesan Chicken Strips Recipe

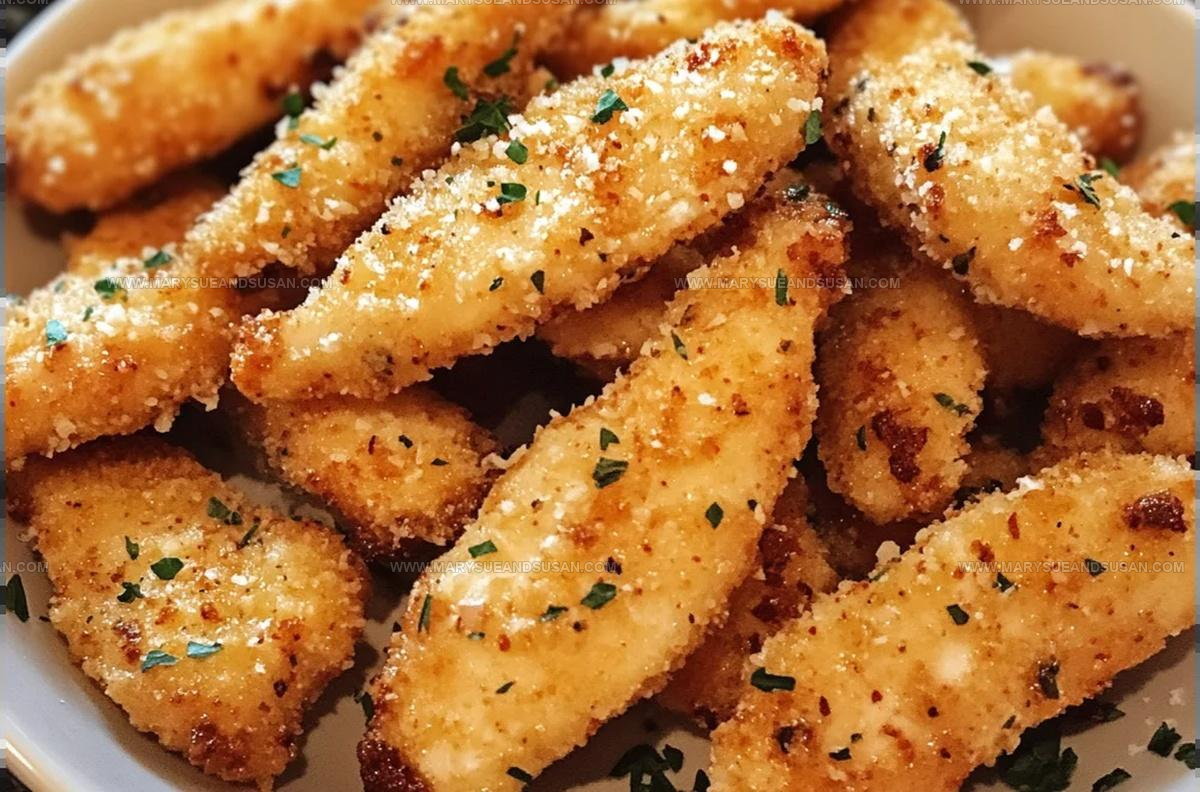
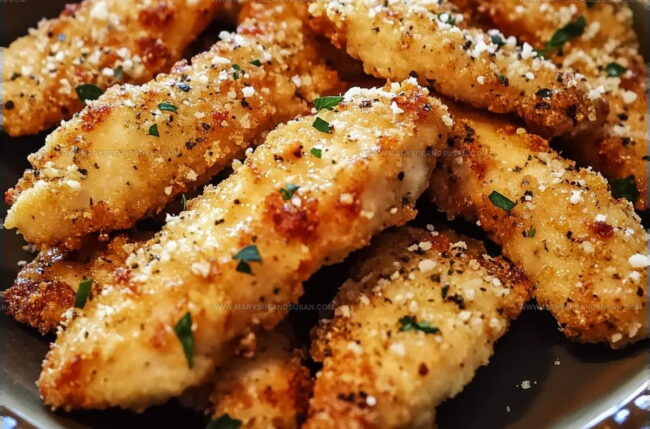
Crispy Garlic Butter Parmesan Chicken Strips Recipe

Garlic butter parmesan chicken strips promise pure comfort on a plate.

Crispy, golden-brown goodness combines classic flavors that satisfy every craving.

Weeknight dinners just became way more exciting with this crowd-pleasing recipe.

Perfectly seasoned strips emerge from the kitchen looking totally mouthwatering and irresistible.

Minimal prep work meets maximum deliciousness in these crowd-pleasing protein bites.

Serious flavor awaits with minimal kitchen effort – anyone can master these delectable strips in minutes.

What Makes Garlic Butter Parmesan Chicken Strips So Crispy

  • Quick and Simple: These chicken strips come together faster than ordering takeout, and your dinner table will be impressed with minimal kitchen effort.
  • Crowd-Pleaser Potential: Kids and adults alike crave these crispy, cheesy strips that transform basic chicken into something special everyone will enjoy.
  • Pantry-Friendly Recipe: Most ingredients are standard kitchen staples, so there’s no need for fancy shopping or complicated ingredient hunting.
  • Healthier Alternative: Baking instead of deep-frying means you get all the satisfying crunch without excess grease, making this a smarter dinner choice.

Full Ingredient List for Garlic Butter Parmesan Chicken Strips

Main Protein:
  • Chicken Tenders (1 lb): Tender strips of chicken that form the core of this delicious dish.
Coating Ingredients:
  • Panko Breadcrumbs (1 cup): Crispy Japanese-style breadcrumbs that give your chicken strips an amazing crunch.
  • Grated Parmesan Cheese (1/2 cup): Adds a savory, cheesy flavor to the coating and helps create a golden exterior.
Seasoning Blend:
  • Garlic Powder (1 teaspoon), Paprika (1/2 teaspoon): Spices that bring depth and warmth to your chicken’s flavor profile.
  • Salt (1/2 teaspoon), Black Pepper (1/4 teaspoon): Essential seasonings to enhance the overall taste of your chicken strips.
Butter and Flavor Enhancers:
  • Unsalted Butter (1/2 cup, melted): Creates a rich, golden coating that helps the breadcrumbs stick to your chicken.
  • Garlic (2 cloves, minced): Adds a robust, aromatic flavor that complements the chicken perfectly.
Optional Garnish:
  • Fresh Parsley (1 tablespoon, chopped): A bright green touch that adds a fresh finish to your chicken strips.

Tools to Have Ready for Garlic Butter Parmesan Chicken Strips

  • Baking Sheet (Large): Your main cooking surface where the chicken strips will transform into crispy, golden delights.
  • Parchment Paper or Cooking Spray: Essential for preventing those tasty strips from sticking and making cleanup super easy.
  • Two Shallow Dishes: Perfect for creating your breading station – one for the garlic butter mixture and another for the crispy breadcrumb coating.
  • Mixing Bowls (Medium): Helpful for combining your breadcrumb ingredients and preparing the garlic butter mixture.
  • Measuring Spoons: Crucial for getting the perfect balance of seasonings in your breadcrumb mixture.
  • Cutting Board: A clean surface for preparing and handling your chicken strips.
  • Sharp Kitchen Knife: Needed for mincing garlic and trimming chicken strips if necessary.
  • Pastry Brush (Optional): Handy for evenly coating chicken strips with the garlic butter mixture.
  • Tongs: Great for flipping chicken strips midway through baking and transferring them to a serving plate.

Easy Way to Prepare Garlic Butter Parmesan Chicken Strips

Easy Way to Prepare Garlic Butter Parmesan Chicken Strips
1

Set Up the Oven

Crank your oven to 400°F and grab a baking sheet. Line it with parchment paper or give it a quick spray of cooking spray to prevent sticking.

2

Mix the Crispy Coating

Time to create the magic coating that’ll make these chicken strips super crunchy. Grab a shallow dish and toss in:

  • 1 cup panko breadcrumbs
  • 1/2 cup grated Parmesan cheese
  • 1 teaspoon garlic powder
  • 1/2 teaspoon paprika
  • 1/2 teaspoon salt
  • 1/4 teaspoon black pepper

Stir everything together until it’s perfectly combined.

3

Prepare the Butter Dip

In a separate bowl, whisk together:

  • 1/2 cup melted unsalted butter
  • 2 minced garlic cloves

This buttery mixture will help the coating stick to your chicken and add serious flavor.

4

Coat the Chicken Strips

Take each of your 1 lb chicken tenders and give them a quick bath in the garlic butter. Then roll them generously in the breadcrumb mixture, pressing gently to make sure the coating sticks like a champ.

5

Arrange and Bake

Spread those coated chicken strips on your prepared baking sheet. Pop them into the preheated 400°F oven for 20-25 minutes. Flip them halfway through to ensure they’re golden and crispy on all sides.

6

Final Touch

Once they’re done, pull them out and sprinkle with some fresh chopped parsley if you’re feeling fancy. Serve these beauties hot with whatever dipping sauce makes your heart happy.

Helpful Cooking Notes For Garlic Butter Parmesan Chicken Strips

  • Melt your butter completely and mix it with fresh minced garlic for maximum flavor coating on your chicken strips.
  • Press the breadcrumb mixture firmly onto each chicken strip to ensure a crispy, even coating that won’t fall off during baking.
  • Spread your chicken strips with some space between them on the baking sheet so they get perfectly crisp on all sides.
  • Use a meat thermometer to confirm your chicken reaches 165°F internally, guaranteeing safe and juicy strips every time.
  • Chop fresh parsley right before sprinkling to release its brightest flavor and add a pop of color to your golden chicken strips.

What Other Variations Work For Garlic Butter Parmesan Chicken Strips

  • Gluten-Free Chicken Strips: Swap panko breadcrumbs for almond flour or crushed gluten-free cornflakes to make your strips safe for those with gluten sensitivities.
  • Herb-Infused Chicken Variation: Replace garlic powder with dried thyme, rosemary, or Italian seasoning to give your chicken strips a fresh herbal flavor profile.
  • Spicy Kick Chicken Strips: Add cayenne pepper or red pepper flakes to the breadcrumb mixture to create a zesty, warming heat that will make your taste buds dance.
  • Air Fryer Alternative: Instead of baking, cook your chicken strips in an air fryer at 375°F for 10-12 minutes, which delivers an equally crispy result with less oil and faster cooking time.

How To Serve Garlic Butter Parmesan Chicken Strips

  • Perfect Side Dishes: Pair these crispy chicken strips with roasted vegetables or a light garden salad. Your dinner plate will look colorful and balanced.
  • Smart Dipping Options: Whip up a quick ranch, marinara, or honey mustard sauce. Guests always appreciate having a tasty sauce to complement the chicken’s garlic and Parmesan flavors.
  • Meal Timing Tip: Serve these strips immediately after baking when they’re super crisp and warm. Your family will love the fresh-from-the-oven crunch.
  • Wine and Drink Pairing: A chilled white wine like Sauvignon Blanc or a crisp beer works wonderfully. Non-alcoholic sparkling water with lemon also makes a refreshing companion.

Smart Storage Tips For Garlic Butter Parmesan Chicken Strips

  • Store leftover chicken strips in an airtight container in the refrigerator, where they’ll stay fresh for 3-4 days. Seal them carefully to keep their crispy texture intact.
  • Reheat your strips in the oven at 350°F for about 10 minutes to help them regain their original crunchiness – microwave heating will make them soggy, so skip that method.
  • Freeze uncooked breaded strips between layers of parchment paper in a freezer-safe container for up to two months. When ready to cook, thaw in the refrigerator overnight before baking.
  • If your strips feel slightly dry when reheating, brush a tiny bit of melted butter on top to help restore moisture and bring back that delicious golden-brown exterior.

Garlic Butter Parmesan Chicken Strips Common Questions

FAQ

Can I use regular breadcrumbs instead of panko?

Regular breadcrumbs work, but panko creates a crispier texture that makes these chicken strips extra crunchy.

FAQ

Do I need to pound the chicken strips before coating?

No need to pound them. Just ensure the chicken strips are relatively uniform in thickness so they cook evenly.

FAQ

How can I tell if the chicken is fully cooked?

Use a meat thermometer to check that the internal temperature reaches 165°F (74°C) at the thickest part of the strip.

FAQ

What dipping sauces pair well with these chicken strips?

Ranch, honey mustard, marinara, or garlic aioli all complement the garlic Parmesan flavor perfectly.

FAQ

Can I make these chicken strips ahead of time?

Prepare and coat the strips, then refrigerate for up to 24 hours before baking. This helps the breading stick better.

FAQ

Are these chicken strips freezer-friendly?

Absolutely! Freeze the unbaked, breaded strips between layers of parchment paper for up to 3 months. Bake directly from frozen, adding a few extra minutes to cooking time.

Print
clock clock iconcutlery cutlery iconflag flag iconfolder folder iconinstagram instagram iconpinterest pinterest iconfacebook facebook iconprint print iconsquares squares iconheart heart iconheart solid heart solid icon
Garlic Butter Parmesan Chicken Strips Recipe

Garlic Butter Parmesan Chicken Strips Recipe


5 Stars 4 Stars 3 Stars 2 Stars 1 Star

4.7 from 11 reviews

  • Total Time: 30-35 minutes
  • Yield: 4 1x

Description

Garlic butter parmesan chicken strips deliver crispy, golden perfection straight from your kitchen. Crunchy coating and rich parmesan make this weeknight dinner a total crowd-pleaser that disappears faster than you can say delicious.


Ingredients

Scale

Protein:

  • 1 lb chicken tenders

Coating and Seasoning:

  • 1 cup panko breadcrumbs
  • ½ cup grated Parmesan cheese
  • 1 teaspoon garlic powder
  • ½ teaspoon paprika
  • ½ teaspoon salt
  • ¼ teaspoon black pepper

Liquid and Aromatics:

  • ½ cup unsalted butter, melted
  • 2 cloves garlic, minced
  • 1 tablespoon fresh parsley, chopped

Instructions

  1. Crank your oven to 400°F and prep a baking sheet with parchment paper or a light spray of cooking oil.
  2. Blend panko breadcrumbs, ½ cup Parmesan cheese, 1 teaspoon garlic powder, ½ teaspoon paprika, ½ teaspoon salt, and ¼ teaspoon black pepper in a shallow dish.
  3. Pour ½ cup melted butter into a separate bowl and stir in 2 minced garlic cloves.
  4. Immerse each chicken tender into the garlic butter, ensuring complete coverage.
  5. Roll the butter-coated tender through the seasoned breadcrumb mixture, pressing gently to help crumbs stick firmly.
  6. Position each breaded tender on the prepared baking sheet, leaving space between strips.
  7. Slide the baking sheet into the 400°F oven and bake for 20-25 minutes, rotating strips halfway through cooking.
  8. Check that chicken reaches an internal temperature of 165°F and appears golden and crispy.
  9. Sprinkle 1 tablespoon chopped parsley over strips if desired and serve immediately with your preferred dipping sauce.

Notes

  • Always pat chicken strips dry before breading to help the coating stick better and create a crispier texture.
  • Use fresh Parmesan cheese for maximum flavor and a more authentic taste compared to pre-grated versions.
  • Check chicken temperature with a meat thermometer to ensure it reaches 165°F (74°C) for safe consumption.
  • Experiment with different herbs and spices in the breadcrumb mixture to customize the flavor profile according to your preference.
  • Prep Time: 10 minutes
  • Cook Time: 20-25 minutes
  • Category: Chicken
  • Method: Baking
  • Cuisine: American

Nutrition

  • Serving Size: 4
  • Calories: 449 kcal
  • Sugar: 1 g
  • Sodium: 448 mg
  • Fat: 30 g
  • Saturated Fat: 16 g
  • Unsaturated Fat: 12 g
  • Trans Fat: 0.5 g
  • Carbohydrates: 19 g
  • Fiber: 1 g
  • Protein: 35 g
  • Cholesterol: 120 mg
Mary Sue

Mary Sue

Founder & Creative Recipe Developer

Expertise

Comfort Food Twists, Seasonal Cooking, Creative Flavor Pairings, Easy Weeknight Dinners, Flexible Pantry Cooking

Education

Trident Technical College, Culinary Institute of Charleston
  • Program: Culinary Arts Technology, A.A.S.
  • Focus: Built a strong foundation in professional food preparation, cooking, and presentation while also learning the hospitality side of the industry, including quality standards, sanitation, and the real-world pace of working kitchens

Mary Sue is the playful, creative recipe mind behind Mary Sue & Susan, known for big flavor ideas, warm storytelling, and dishes that feel both comforting and a little unexpected. She has a talent for taking familiar meals and giving them just enough personality to make them memorable.

Leave a Reply

Your email address will not be published. Required fields are marked *

Recipe rating 5 Stars 4 Stars 3 Stars 2 Stars 1 Star