
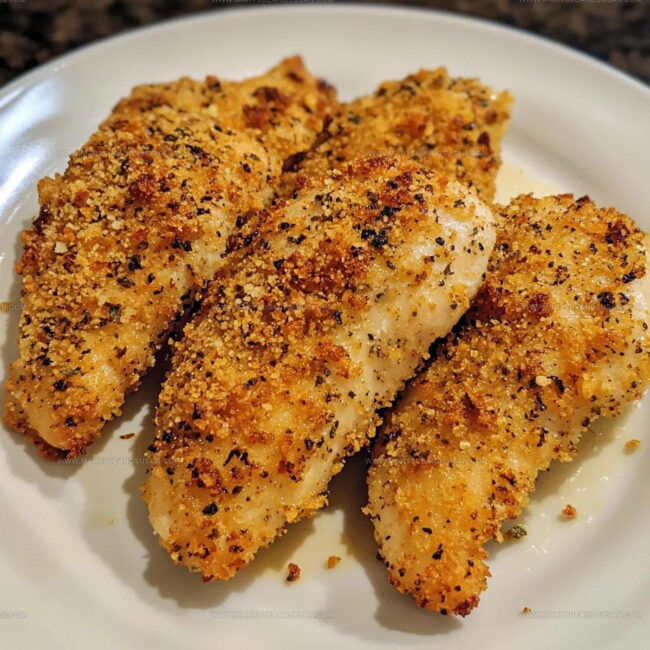
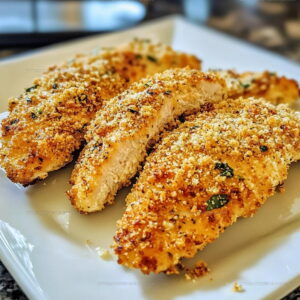
Garlic Parmesan Chicken Tenders Recipe for Crunchy Perfection
Crispy garlic parmesan chicken tenders represent pure comfort food magic that everyone craves.
Satisfying and simple, these golden-brown delights promise to become an instant family favorite.
Seasoned with classic flavors, the recipe transforms ordinary chicken into something spectacular.
Crispy exteriors give way to tender, juicy meat that melts in your mouth.
Perfect for weeknight dinners or casual gatherings, this dish brings serious flavor without complicated techniques.
Restaurant-quality results emerge from straightforward preparation that anyone can master.
Serve these delectable tenders alongside your preferred sides for a meal that sparks smiles and satisfies hunger.
What Makes Crispy Garlic Parmesan Chicken Tenders So Popular
Full List of Ingredients for Crispy Garlic Parmesan Chicken Tenders
Main Protein:Main Coating Components:Seasoning Blend:Binding Ingredients:Finishing Touch:Handy Kitchen Tools for Crispy Garlic Parmesan Chicken Tenders
How Do You Prepare Crispy Garlic Parmesan Chicken Tenders
Prepare the Oven
Crank up the oven to 425°F and grab a baking sheet. Line it with parchment paper to keep cleanup super easy.
Create the Crispy Coating
Grab a shallow bowl and mix your dry ingredients. This is where the magic happens for your crispy coating:
Whisk these together until everything is beautifully combined.
Prepare the Eggs
Crack 2 eggs into a separate bowl and beat them until smooth and well blended. This will help your coating stick like a champ.
Coat the Chicken
Take each chicken tender and do a quick dip dance. First, roll it through the beaten eggs, then coat it generously in the Parmesan breadcrumb mixture. Press the coating gently to make sure it really sticks to the chicken.
Arrange and Drizzle
Carefully place each coated chicken tender on the prepared baking sheet. They shouldn’t touch each other. Drizzle 2 tablespoons of olive oil or melted butter over the top to help them get golden and crisp.
Bake to Perfection
Slide the baking sheet into the preheated oven. Bake for 20-25 minutes, flipping the tenders halfway through. You’re looking for a gorgeous golden-brown color and completely cooked chicken.
Serve and Enjoy
Pull those crispy tenders out of the oven and let them rest for a minute. Serve immediately with your favorite dipping sauce and watch everyone dig in!
What Makes Crispy Garlic Parmesan Chicken Tenders Work Best
Creative Variations For Crispy Garlic Parmesan Chicken Tenders
How To Serve Crispy Garlic Parmesan Chicken Tenders
Practical Storage Notes For Crispy Garlic Parmesan Chicken Tenders
Crispy Garlic Parmesan Chicken Tenders FAQs
Can I use chicken breasts instead of tenders?
Absolutely! Slice chicken breasts into strips about the same thickness as tenders for consistent cooking.
Do these chicken tenders work for meal prep?
Definitely. Store cooled tenders in an airtight container and reheat in the oven to maintain crispiness.
How can I make them extra crispy?
Ensure your breadcrumb mixture is well-seasoned and press the coating firmly onto the chicken. The olive oil or melted butter drizzle helps create a golden, crunchy exterior.
Are these chicken tenders gluten-free?
Replace panko breadcrumbs with gluten-free breadcrumbs or crushed gluten-free crackers to make the recipe celiac-friendly.
What if I don’t have Parmesan cheese?
Romano cheese works great as a substitute, or you can use additional breadcrumbs with extra seasonings for similar flavor and texture.
Oven-Crispy Garlic Parmesan Chicken Tenders Recipe
- Total Time: 30-35 minutes
- Yield: 4 1x
Description
Crispy Garlic Parmesan Chicken Tenders make dinner feel like a celebration with minimal effort and maximum flavor. Crunchy, cheesy, and totally addictive, these tenders will become your new go-to weeknight meal that keeps everyone asking for seconds.
Ingredients
Protein:
- 1 pound chicken tenders
Main Coating:
- 1 cup freshly grated Parmesan cheese
- 1 cup panko breadcrumbs
Seasonings and Binders:
- 2 eggs
- 1 teaspoon garlic powder
- 1 teaspoon Italian seasoning
- 2 tablespoons olive oil
- Salt
- Pepper
Instructions
- Preheat the oven to a sizzling 425°F and cover a baking sheet with parchment paper for easy cleanup.
- Combine 1 cup Parmesan cheese, 1 cup panko breadcrumbs, 1 teaspoon garlic powder, 1 teaspoon Italian seasoning, salt, and pepper in a shallow mixing bowl.
- Whisk 2 eggs in a separate bowl to create a smooth, uniform coating for your chicken.
- Dunk each chicken tender into the egg mixture, ensuring complete coverage for maximum crispiness.
- Roll the egg-coated chicken in the Parmesan breadcrumb mixture, pressing firmly to help the coating stick thoroughly.
- Arrange the coated chicken tenders on the prepared baking sheet, leaving space between each piece for even browning.
- Drizzle 2 tablespoons of olive oil or melted butter over the tenders to enhance golden color and crunch.
- Slide the baking sheet into the preheated oven and bake for 20-25 minutes, carefully flipping the tenders halfway through cooking.
- Check that the chicken reaches an internal temperature of 165°F and has a beautiful golden-brown exterior.
- Remove from the oven and let rest for 2-3 minutes before serving with your favorite dipping sauce.
Notes
- Always use fresh Parmesan cheese for the best flavor and crispiest coating.
- Pat chicken tenders completely dry before coating to help breadcrumbs stick better and create maximum crunch.
- For a gluten-free version, swap panko breadcrumbs with almond flour or crushed gluten-free crackers.
- Letting the coated chicken rest for 5 minutes before baking helps the breading set and become extra crispy.
- Prep Time: 10 minutes
- Cook Time: 20-25 minutes
- Category: Chicken
- Method: Baking
- Cuisine: American
Nutrition
- Serving Size: 4
- Calories: 385 kcal
- Sugar: 1 g
- Sodium: 520 mg
- Fat: 21 g
- Saturated Fat: 5 g
- Unsaturated Fat: 15 g
- Trans Fat: 0 g
- Carbohydrates: 14 g
- Fiber: 1 g
- Protein: 38 g
- Cholesterol: 125 mg
Susan Whitaker
Content Specialist & Home Cooking Guide
Expertise
Family-friendly Meals, Simple Healthy Cooking, Ingredient Substitutions, Beginner-friendly Recipes, Flexible Meal Prep
Education
Susan is the steady, practical guide at Mary Sue & Susan, bringing clarity, structure, and a warm sense of encouragement to every recipe she touches. Susan joined the site with a simple goal: help people cook with more confidence and less guesswork.