Coconut Chicken Tenders Recipe With Crispy Golden Coating
Coconut chicken tenders recipe fans know that few foods combine tropical flair with family-friendly comfort quite like crispy, golden strips that please every palate at the table.
This dish has become a weeknight favorite in homes across the country, offering a fun twist on a classic favorite without requiring advanced cooking skills.
The combination of crunch and subtle sweetness makes it perfect for dinner, lunch boxes, or casual gatherings with friends.
Kids gobble them up happily while grown-ups appreciate the satisfying texture and flavor that feels special yet familiar.
Serve them alongside simple sides for an easy meal, or pack them for picnics and potlucks where they always disappear fast.
The best part is how quickly they come together, making busy evenings much more manageable without sacrificing taste or quality.
You can feel confident serving something that looks impressive but won't keep you stuck in the kitchen for hours.
What Makes Coconut Chicken Tenders So Crunchy
Coconut Chicken Tender Ingredient Essentials
Protein:Dry Coating:Wet Ingredients and Cooking:Equipment You’ll Use for Coconut Chicken Tenders
How Does Coconut Chicken Tenders Come Together

Prep the Oven
Crank your oven to a toasty 425°F. Grab a large baking sheet and line it with parchment paper so nothing sticks.
Create Flour Blend
Grab a shallow bowl and mix together your dry coating.
Stir everything until it’s nicely combined and looks evenly seasoned.
Egg Station Setup
In another shallow bowl, crack 2 large eggs and whisk them until they’re smooth and well blended.
Coconut Coating Prep
Spread 2 cups of sweetened shredded coconut on a separate plate, ready for your chicken’s final roll.
Chicken Drying
Take those chicken tenderloins and pat them completely dry with paper towels. This helps the coating stick better.
First Coating Layer
Dunk each tenderloin into your seasoned flour mixture, making sure every inch gets a nice dusty coat.
Egg Dip
Take your flour-coated chicken and give it a quick bath in the whisked eggs, letting any extra drip off.
Coconut Crunch
Roll each eggy chicken piece through the shredded coconut, pressing gently so those sweet coconut flakes really grab onto the meat.
Quick Fry
Heat 1/4 cup vegetable oil in a large skillet over medium-high heat. Fry your coated tenders for 2-3 minutes per side until they turn a gorgeous golden brown.
Bake to Perfection
Transfer those partially cooked tenders to your prepared baking sheet. Slide them into the 425°F oven for 10-12 minutes until they hit an internal temperature of 165°F.
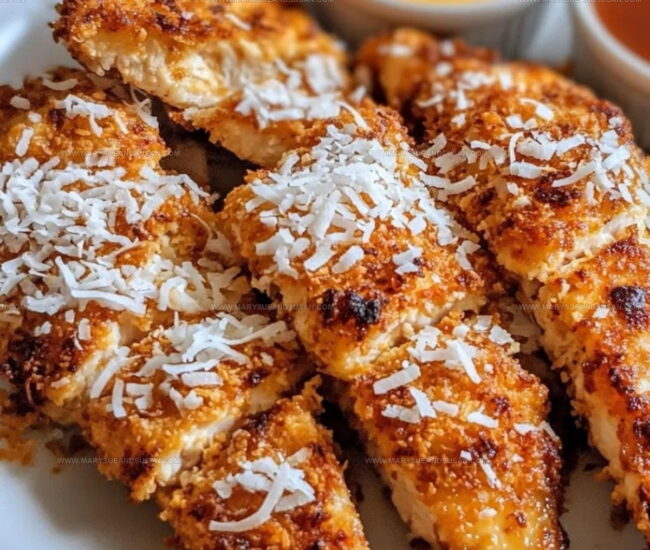
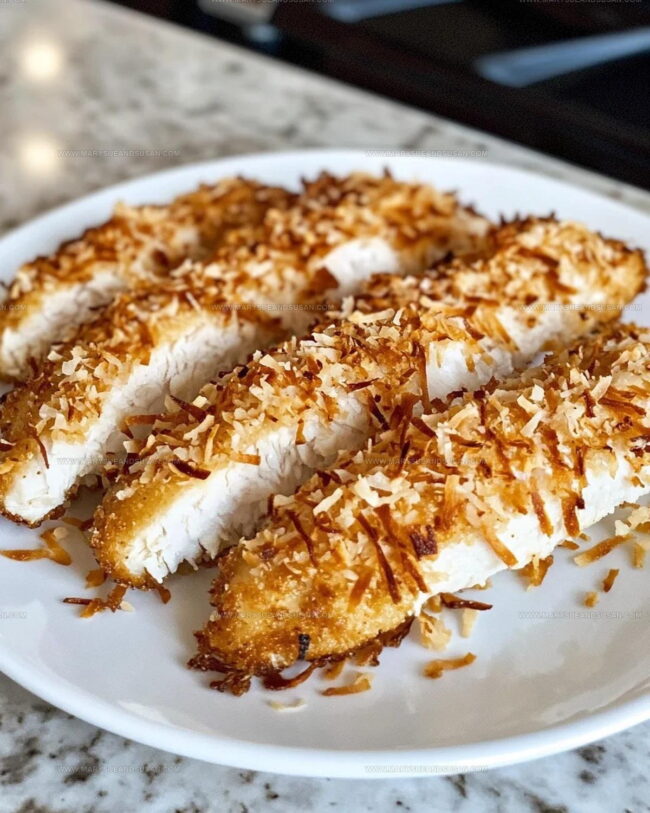
Rest and Serve
Pull the tenders out and let them rest for 3-4 minutes. Serve hot with 1/4 cup sweet chili sauce on the side for dipping.
Cooking Know-How for Coconut Chicken Tenders
Flavor Options for Coconut Chicken Tenders
How To Plate Coconut Chicken Tenders
How Do You Store Coconut Chicken Tenders
Coconut Chicken Tenders Frequently Asked Questions
Can I use chicken breasts instead of tenderloins?
Definitely! Just slice chicken breasts into strips about the same size as tenderloins for even cooking.
Do I need fresh or sweetened coconut?
Use unsweetened shredded coconut for the best crispy coating that won’t burn quickly.
How do I make these extra crispy?
Press the coconut firmly onto the chicken and use panko breadcrumbs mixed with coconut for added crunch.
Are these chicken tenders kid-friendly?
Absolutely – the crispy coconut coating makes these super appealing to children who might be picky eaters.
Can I prepare these ahead of time?
Bread the chicken tenders in advance and refrigerate on a baking sheet, then cook right before serving for maximum freshness.
What if I don’t have vegetable oil?
Canola or avocado oil work perfectly as substitutes with similar neutral flavor profiles.

Pan Fried Coconut Chicken Tenders Recipe
- Total Time: 25-28 minutes
- Yield: 4 1x
Description
Coconut Chicken Tenders bring Caribbean flair to your dinner table, wrapping tender chicken in a golden, crunchy coconut coating that’ll make your taste buds dance. Grab some pantry staples and get ready to turn an ordinary weeknight meal into a tropical feast that feels like a vacation on your plate.
Ingredients
Protein:
- 1.5 lbs chicken tenderloins
Dry Coating:
- 2 cups sweetened shredded coconut
- 1 cup all-purpose flour
- 1 tsp salt
- ½ tsp black pepper
- ½ tsp garlic powder
- ¼ tsp paprika
Wet Ingredients and Cooking:
- 2 large eggs
- ¼ cup vegetable oil
- ¼ cup sweet chili sauce
Instructions
- Preheat your oven to 425°F and cover a large baking sheet with parchment paper.
- Create a seasoned flour mixture by combining 1 cup flour, 1 tsp salt, ½ tsp black pepper, ½ tsp garlic powder, and ¼ tsp paprika in a shallow bowl.
- Whisk 2 large eggs in a separate shallow bowl until thoroughly blended.
- Spread 2 cups sweetened shredded coconut on a third plate for coating.
- Take 1.5 lbs chicken tenderloins and pat them completely dry with paper towels.
- Dredge each tenderloin in the seasoned flour, ensuring total coverage.
- Dip the floured chicken into the whisked eggs, letting excess liquid drip away.
- Roll the chicken in shredded coconut, pressing gently to make coconut stick firmly.
- Heat ¼ cup vegetable oil in a large skillet over medium-high heat.
- Fry chicken tenders for 2-3 minutes per side until they turn golden brown.
- Transfer partially cooked tenders to the prepared baking sheet.
- Bake for 10-12 minutes until the internal temperature hits 165°F.
- Remove from oven and let chicken rest for 3-4 minutes before serving.
- Serve hot with ¼ cup sweet chili sauce for optional dipping.
Notes
- Toast the coconut in a dry skillet before coating for deeper, nuttier flavor and extra crispiness.
- Pat chicken completely dry to help coconut coating stick better and create a crunchier exterior.
- For gluten-free version, swap regular flour with almond flour or gluten-free flour blend.
- Use unsweetened shredded coconut to control sweetness and keep coating more savory and light.
- Prep Time: 10 minutes
- Cook Time: 15-18 minutes
- Category: Chicken
- Method: Frying
- Cuisine: American
Nutrition
- Serving Size: 4
- Calories: 491 kcal
- Sugar: 14 g
- Sodium: 376 mg
- Fat: 28 g
- Saturated Fat: 17 g
- Unsaturated Fat: 10 g
- Trans Fat: 0 g
- Carbohydrates: 27 g
- Fiber: 3 g
- Protein: 38 g
- Cholesterol: 111 mg
Susan Whitaker
Content Specialist & Home Cooking Guide
Expertise
Family-friendly Meals, Simple Healthy Cooking, Ingredient Substitutions, Beginner-friendly Recipes, Flexible Meal Prep
Education
Susan is the steady, practical guide at Mary Sue & Susan, bringing clarity, structure, and a warm sense of encouragement to every recipe she touches. Susan joined the site with a simple goal: help people cook with more confidence and less guesswork.