
Crispy Tuna Patties Recipe for Quick Weeknight Dinners
Tuna patties offer a budget-friendly way to enjoy seafood any night of the week.
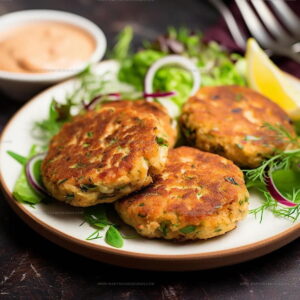
The crispy golden exterior gives way to a tender, flavorful center that satisfies even the pickiest eaters at the table.
Serve them as a main course alongside simple sides, or tuck them into buns for a delicious sandwich option.
They work beautifully for meal prep since they reheat well and taste just as good the next day.
Kids who usually turn their noses up at fish often devour them without hesitation.
Plus, pantry staples mean you can prepare a satisfying meal without a last-minute grocery run.
Check out the recipe below and see how simple it is to make something so satisfying.
Why Easy Tuna Patties Is A Go To
Ingredient List for Easy Tuna Patties
Main Fish Ingredient:Binding Ingredients:Seasoning Ingredients:Cooking Fat:Everyday Kitchen Equipment for Tuna Patties
Steps for Making Easy Tuna Patties

Prepare Tuna
Grab your colander and drain those tuna cans completely. Give them a good squeeze to get rid of any extra moisture. This helps keep your patties from getting soggy.
Mix the Ingredients
In a medium bowl, toss together these tasty bits:
Use your hands to mix everything until it’s well combined and feels like it’ll stick together nicely.
Shape the Patties
Form the mixture into 4 patties, each about 1/2 inch thick. Make sure they’re packed tight so they don’t fall apart when cooking.
Chill the Patties
Pop those patties in the refrigerator for 10 minutes. This little rest helps them hold their shape when they hit the hot pan.
Prepare the Skillet
Heat 2 tbsp olive oil in a large skillet over medium heat (around 350°F). Wait until the oil starts to shimmer and look slightly wavy.
First Side Cooking
Carefully place the patties in the hot skillet. Let them cook for 3-4 minutes until the bottom turns a beautiful golden brown.
Flip and Finish
Gently flip the patties and cook the other side for another 3-4 minutes. You want both sides to be golden and the patties heated through.
Drain Excess Oil
Transfer the cooked patties to a paper towel-lined plate to soak up any extra oil.
Serve and Enjoy
Plate those golden beauties right away. Squeeze some fresh lemon on top or serve with your favorite dipping sauce. Dinner is ready!
Kitchen Notes For Easy Tuna Patties
Easy Variations for Tuna Patties
Serving And Pairing Ideas For Easy Tuna Patties
What’s The Proper Storage For Easy Tuna Patties
Easy Tuna Patties Helpful FAQs
Can I use canned salmon instead of tuna?
Absolutely! Salmon works perfectly as a substitute and provides a similar texture and protein content for the patties.
Do these patties freeze well?
Yes, wrap each patty individually in plastic wrap, then place in a freezer bag. They’ll keep nicely for up to 3 months when properly sealed.
Is there a gluten-free option for the breadcrumbs?
Definitely! Replace traditional breadcrumbs with gluten-free breadcrumbs or crushed rice crackers to make the recipe celiac-friendly.
Can I bake these instead of pan-frying?
Certainly! Bake the patties on a lined baking sheet at 400°F for about 12-15 minutes, flipping halfway through to ensure even browning.
What if the patties fall apart when cooking?
Make sure to drain the tuna completely and press out excess moisture. Chilling the patties before cooking helps them hold together better.
Tuna Patties Recipe
- Total Time: 23 minutes
- Yield: 4 1x
Description
These Tuna Patties deliver a quick, satisfying meal packed with flavor and protein that comes together faster than takeout. Crispy on the outside and tender inside, they make perfect weeknight dinner heroes your whole family will devour.
Ingredients
Main Protein:
- 2 (6 ounces) cans of tuna
Binding and Flavor Enhancers:
- 1 large egg
- ½ cup breadcrumbs
- ¼ cup mayonnaise
- 2 tablespoons chopped fresh parsley
- 1 teaspoon dijon mustard
- ½ teaspoon garlic powder
- ¼ teaspoon salt
- ⅛ teaspoon black pepper
Cooking Fat:
- 2 tablespoons olive oil
Instructions
- Completely drain 2 (6 oz) cans of tuna in a colander, pressing out every drop of liquid with the back of a spoon.
- Combine drained tuna with ½ cup breadcrumbs, ¼ cup mayonnaise, 1 large egg, 2 tbsp chopped parsley, 1 tsp dijon mustard, ½ tsp garlic powder, ¼ tsp salt, and ⅛ tsp black pepper in a medium mixing bowl.
- Use your hands to blend ingredients thoroughly, ensuring even distribution of seasonings throughout the mixture.
- Shape the mixture into 4 equal patties, each measuring approximately ½ inch thick with gentle, firm pressure.
- Place patties in the refrigerator for 10 minutes to help them maintain their structure during cooking.
- Heat 2 tbsp olive oil in a large skillet over medium heat (375°F) until the oil begins to shimmer and look slightly rippled.
- Carefully place patties in the hot skillet, cooking for 3-4 minutes until the bottom turns a deep golden brown.
- Gently flip the patties using a spatula and cook the second side for an additional 3-4 minutes until golden and heated completely through.
- Transfer the cooked patties to a paper towel-lined plate to absorb any excess oil.
- Serve hot with fresh lemon wedges or your favorite dipping sauce for added zest.
Notes
- Drain the tuna super well by pressing firmly in a colander to remove all moisture, which helps patties hold together perfectly.
- Chilling the patties for 10 minutes before cooking helps them stay compact and prevents falling apart during frying.
- Use fresh breadcrumbs instead of dried for a lighter, more tender texture that complements the tuna’s delicate flavor.
- For a gluten-free version, swap breadcrumbs with almond meal or crushed gluten-free crackers to maintain the same crispy exterior.
- Prep Time: 15 minutes
- Cook Time: 8 minutes
- Category: Tuna
- Method: Frying
- Cuisine: American
Nutrition
- Serving Size: 4
- Calories: 320 kcal
- Sugar: 1 g
- Sodium: 520 mg
- Fat: 20 g
- Saturated Fat: 3 g
- Unsaturated Fat: 16 g
- Trans Fat: 0 g
- Carbohydrates: 13 g
- Fiber: 1 g
- Protein: 25 g
- Cholesterol: 85 mg
Susan Whitaker
Content Specialist & Home Cooking Guide
Expertise
Family-friendly Meals, Simple Healthy Cooking, Ingredient Substitutions, Beginner-friendly Recipes, Flexible Meal Prep
Education
Susan is the steady, practical guide at Mary Sue & Susan, bringing clarity, structure, and a warm sense of encouragement to every recipe she touches. Susan joined the site with a simple goal: help people cook with more confidence and less guesswork.